Mazda CX-5 Service & Repair Manual: Seat Warmer Control Unit Removal/Installation
WARNING:
-
Handling a side air bag improperly can accidentally operate (deploy) the air bag, which may seriously injure you. Read the service warnings/cautions in the Workshop Manual before handling the front seat (side air bag integrated)..
1. Switch the ignition off (LOCK).
2. Disconnect the negative battery cable and wait for 1 min
..
3. Disconnect the connector.
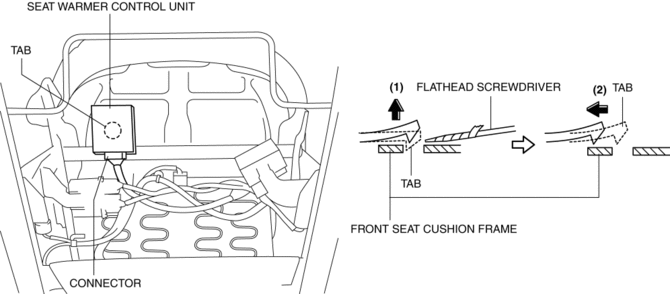
4. Using a flathead screwdriver, disconnect the seat warmer control unit in the direction of the arrow (2) while releasing tab in the direction of the arrow (1) shown in the figure.
5. Install in the reverse order of removal.
 Seat Warmer Control Unit Inspection
WARNING:
Handling a front seat (with built-in side air bag) improperly can accidentally
operate (deploy) the air bag, which may seriously injure you. Read the service
warnings/cautions b ...
 Seat Warmer Switch Removal/Installation
NOTE:
The seat warmer switch are integrated into the climate control unit. (with
full-auto air conditioner system)
The seat warmer switch are integrated into the clock. (with manual ...
Other materials:
Extractor Chamber Removal/Installation
1. Disconnect the negative battery cable..
2. Remove the following parts:
a. Rear splash shield.
b. Rear combination light.
c. Rear bumper.
3. Insert a tape-wrapped flathead screwdriver shown in the figure and remove
clips in the direction of arrow (1).
4. Remove the extractor cham ...
Front Seat Removal/Installation
WARNING:
Handling a side air bag improperly can accidentally operate (deploy) the
air bag, which may seriously injure you. Read the service warnings/cautions
in the Workshop Manual before handling the front seat (side air bag integrated)..
If the sliding mechanisms on both side ...
Rear Window Defroster/Outer Mirror Heater
Outline
Fogging is cleared from the rear window and outer mirror glass by heating
of the filament.
Structural view
System wiring diagram
Vehicles with full-auto air conditioner system
Vehicles with manual air conditioner system
Construction
Rear window defroster
...
