Mazda CX-5 Service & Repair Manual: Rear Window Glass Installation
WARNING:
-
Using a utility knife with bare hands can cause injury. Always wear gloves when using a utility knife.
CAUTION:
-
Proper installation of the glass may be difficult if sealant is cracked or the glass is pushed out by air pressure when a door is opened/closed with all the window glass closed. Keep the door glass open until the rear window glass installation is completed.
1. Remove sealant along the perimeter of the glass using a utility knife or scraper. (When reusing the glass)
2. Clean and degrease an approx. 50 mm {2.0 in}
wide strip along the perimeter of the glass.
3. Inspect the glass for cracks. If it is cracked, chamfer it using sandpaper.
4. Install spacers, pins and fastener to the glass as shown in the figure.
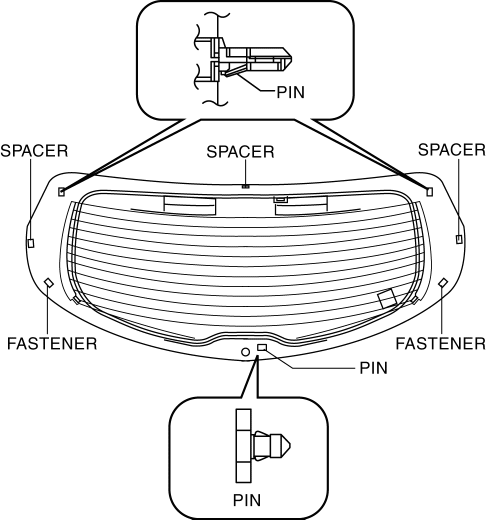
NOTE:
-
When reusing the glass, align it with the alignment mark placed before the glass was removed.
5. Apply glass primer on the glass as shown in the figure then allow it to dry for approx. 30 min
.
CAUTION:
-
To prevent weakening of the primer adhesion, keep the bonding surface free of dirt, moisture, and grease. Do not touch the surface with your hand.
NOTE:
-
Apply primer to the hollowed marks in the ceramic coating.
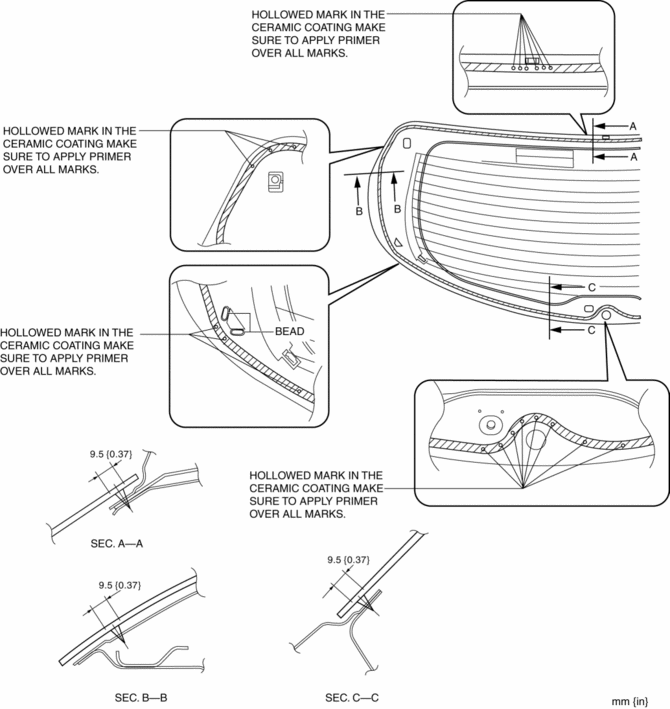
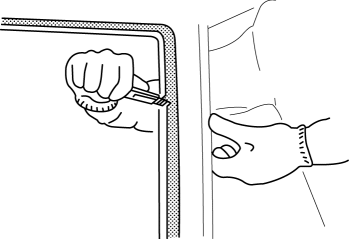
6. Cut away the old sealant using a utility knife or scraper so that 1—2 mm {0.04—0.07 in}
thickness of sealant remains along the perimeter of the frame.
7. Clean and degrease along the perimeter of the bonding area on the body.
8. If the sealant has come off completely in any one place, apply some primer, and allow it to dry for approx. 30 min
.
CAUTION:
-
To prevent weakening of the primer adhesion, keep the bonding surface free of dirt, moisture, and grease. Do not touch the surface with your hand.
9. Apply body primer on the body as shown in the figure, then allow it to dry for approx. 30 min
.
CAUTION:
-
To prevent weakening of the primer adhesion, keep the bonding surface free of dirt, moisture, and grease. Do not touch the surface with your hand.
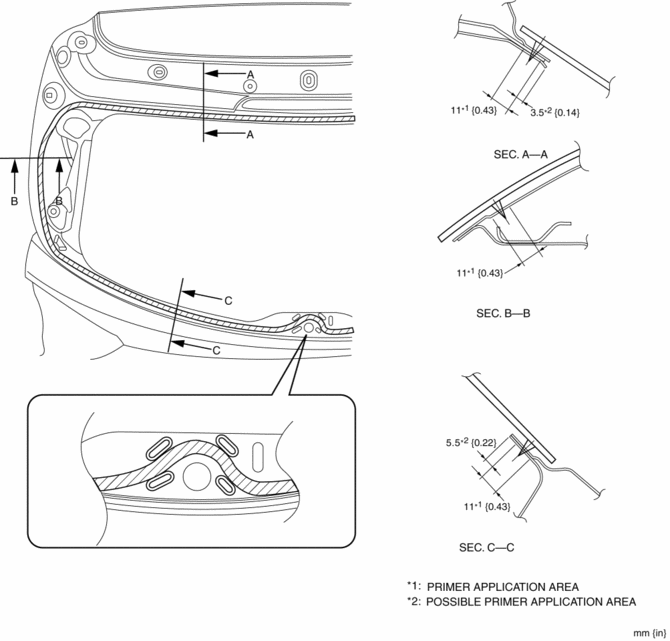
10. Apply sealant to the area of the glass surface as shown in the figure.
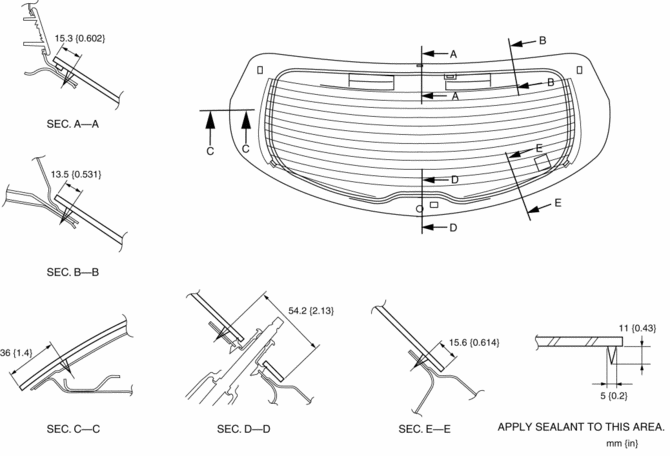
11. Install the rear window glass.
12. Verify that the gap at the upper and lower parts of the glass is within the specification shown in the figure, then press along the perimeter of the glass.
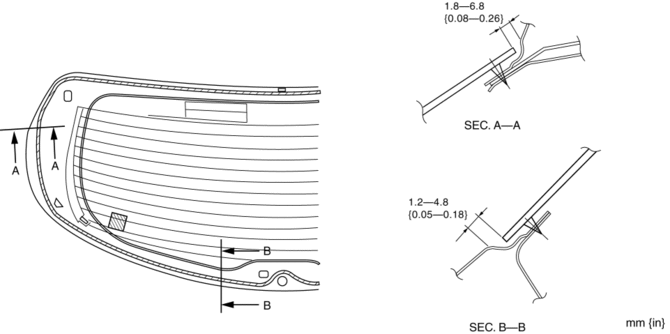
13. Connect the filament connectors in the direction of the arrow in the order of (1), (2) shown in the figure.
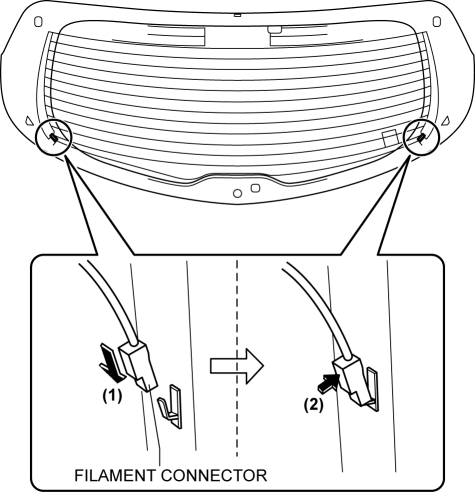
14. Connect the antenna feeder No.3 connector. (with SIRIUS satellite radio system)
15. Install the following parts:
a. Rear wiper motor.
b. Rear wiper arm and blade.
c. Rear spoiler.
d. Liftgate lower trim.
e. Liftgate recess.
f. Liftgate side trim.
g. Liftgate upper trim.
16. Connect the negative battery cable..
17. Allow the sealant to harden completely. Sealant hardening time: 24 h
 Rear Window Defroster/Outer Mirror Heater
Outline
Fogging is cleared from the rear window and outer mirror glass by heating
of the filament.
Structural view
System wiring diagram
Vehicles with full-auto air conditioner s ...
 Rear Window Glass Removal
1. Disconnect the negative battery cable..
2. Remove the following parts:
a. Liftgate upper trim.
b. Liftgate side trim.
c. Liftgate recess.
d. Liftgate lower trim.
e. Rear spoiler.
f. R ...
Other materials:
Air Bag Module And Pre Tensioner Seat Belt Disposal Procedures [Two Step Deployment
Control System]
WARNING:
A live (undeployed) air bag module, pre-tensioner seat belt or lap pre-tensioner
seat belt may accidentally operate (deploy) when it is disposed of and cause
serious injury. Always refer to the “AIR BAG MODULE AND PRE-TENSIONER SEAT BELT
DEPLOYMENT PROCEDURES” and dispo ...
Liftgate Lower Trim Removal/Installation
1. Remove the following parts:
a. Liftgate upper trim.
b. Liftgate side trim.
c. Liftgate recess.
2. Remove fasteners A.
3. Take the shaded area shown in the figure, and pull the liftgate lower trim
in the direction of the arrow in the order of (1), (2), (3), (4) and remove it while ...
Front Drive Shaft Removal/Installation
CAUTION:
Performing the following procedures without first removing the ABS wheel-speed
sensor may possibly cause an open circuit in the wiring harness if it is pulled
by mistake. Before performing the following procedures, disconnect the ABS wheel-speed
sensor connector (axle side) ...
