Mazda CX-5 Service & Repair Manual: Front Body Straight Line Dimensions (1) [Dimensions]
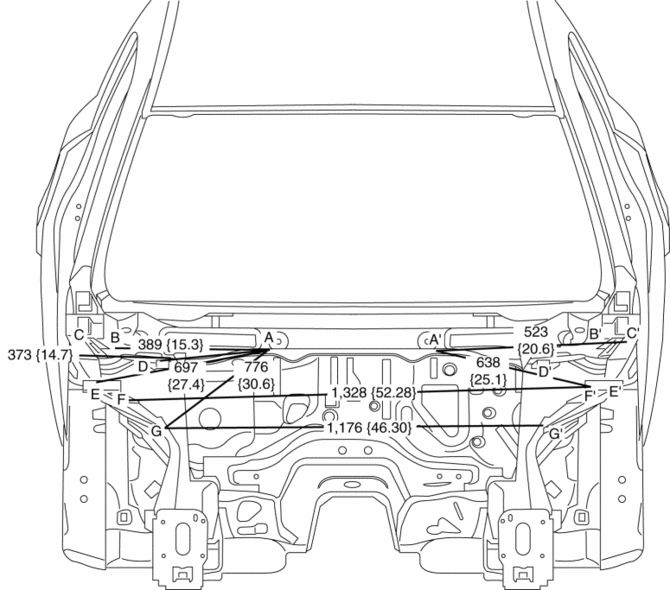
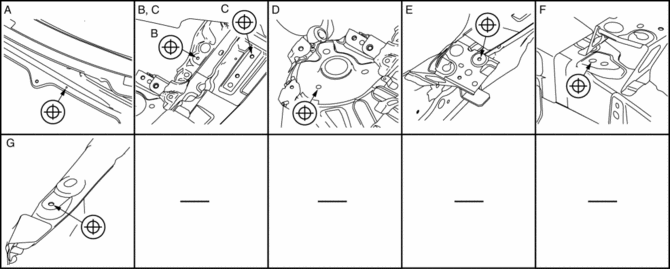
|
Point symbol |
Designation |
Hole diameter or bolt or nut size mm {in} |
|
A |
Cowl panel installation hole |
?5 {0.2} |
|
B |
Wiper bracket datum hole |
?7 {0.3} |
|
C |
Hood hinge installation hole |
?10 {0.39} |
|
D |
Front suspension upper mounting installation hole |
?10.2 {0.402} |
|
E |
Front fender panel installation hole |
?7 {0.3} |
|
F |
Apron reinforcement lower datum hole |
?10 {0.39} |
|
G |
Shroud upper member installation hole |
?7 {0.3} |
 Dumping Sheet Replacement [Water Proof And Rust Preventive]
After repairing the body, attach the dumping sheet to the location shown
in the figure for noise insulation.
...
 Front Body Straight Line Dimensions (2) [Dimensions]
Point symbol
Designation
Hole diameter or bolt or nut size mm {in}
A
Roof seamless location
-
...
Other materials:
Fuel-Filler Lid and Cap
WARNING
When removing the fuel-filler cap, loosen the cap slightly and wait for any hissing
to stop. Then remove it:
Fuel spray is dangerous. Fuel can burn skin and eyes and cause illness if ingested.
Fuel spray is released when there is pressure in the fuel tank and the fuel-filler
cap is r ...
Manual Transaxle Operation
Manual Transaxle Shift Pattern
The shift pattern of the transaxle is conventional, as shown.
Depress the clutch pedal all the way down while shifting; then release it slowly.
Your vehicle is equipped with a device to prevent shifting to R (reverse) by
mistake.
Push the shift lever downward a ...
Front Bumper Removal/Installation
CAUTION:
Affix the protective tape to the position (vehicle body side) shown in the
figure to prevent scratches and damage.
1. Disconnect the negative battery cable..
2. Remove fasteners A.
3. Pull the front over fender in the direction of the arrow shown in the figure ...
