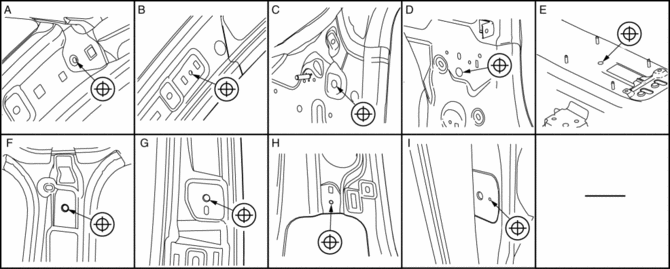
Mazda CX-5 Service & Repair Manual: Room Straight Line Dimensions (1) [Dimensions]

|
Point symbol |
Designation |
Hole diameter or bolt or nut size mm {in} |
|
A |
Front pillar inner datum hole |
?7 {0.3} |
|
B |
Front pillar inner datum hole |
?7 {0.3} |
|
C |
Dashboard installation hole |
?14 {0.55} |
|
D |
Side sill inner front datum hole |
?16 {0.63} |
|
E |
Parking brake lever installation hole |
?12 {0.47} |
|
F |
Front seat belt upper anchor installation hole |
?14 {0.55} |
|
G |
Front seat belt upper anchor installation hole |
?14 {0.55} |
|
H |
Center pillar inner datum hole |
?7 {0.3} |
|
I |
Front door checker installation hole |
?4 {0.2} |
 Rear Side Frame Removal [Panel Replacement]
Symbol Mark
Removal Procedure
NOTE:
When drilling the 35 locations indicated by (A) and 4 locations indicated
by (C) shown in the figure, do not drill a hole all the way through or th ...
 Room Straight Line Dimensions (2) [Dimensions]
Point symbol
Designation
Hole diameter or bolt or nut size mm {in}
A
Front seat belt upper anchor installation
...
Other materials:
Purge Solenoid Valve Removal/Installation
1. Disconnect the negative battery cable..
2. Remove the plug hole plate..
3. Remove the air cleaner and air hose as a single unit..
4. Disconnect the high pressure fuel pump connector.
5. Disconnect the harness clip as shown in the figure.
6. Remove in the order indicated in the table ...
Exterior Care
The paintwork on your Mazda represents the latest technical developments in composition
and methods of application.
Environmental hazards, however, can harm the paint's protective properties, if
proper care is not taken.
Here are some examples of possible damage, with tips on how to preven ...
Tire Pressure Warning Alarm
Purpose
The tire pressure warning alarm warns the user that a tire pressure has decreased
or notifies the user that the tire pressure warning alarm has been reset.
Function
If the instrument cluster receives a tire pressure warning alarm request
signal sent from the D ...
