Mazda CX-5 Service & Repair Manual: Repairable Range Of Polypropylene Bumpers [Plastic Body Parts]
The three types of damaged bumpers shown below are considered repairable. Although a bumper which has been damaged greater than this could also be repaired, it should be replaced with a new one because such repair would detract from the looks and quality of the bumper. In addition, such repair is not considered reasonable in terms of work time.
Repairable Bumpers
1. A bumper with a hole less than 50 mm {1.97 in} in diameter.

2. A bumper with a crack less than 100 mm {3.94 in} in length.
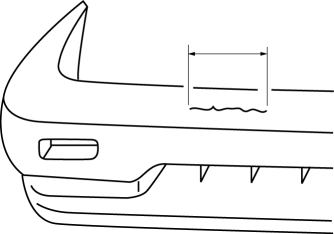
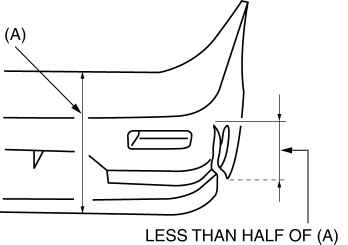
3. A bumper with a crack less than 100 mm {3.94 in} in length that is less than half of the width of the bumper.
 Rear Scuff Plate Removal/Installation
1. Take the shaded area shown in the figure, detach tab A while pulling the rear
scuff plate in the direction of the arrow (1) shown in the figure, then detach hook
B, clips C, pins D while pullin ...
 Shift Panel Removal/Installation
ATX
1. Disconnect the negative battery cable..
2. Selector lever to neutral position.
3. Remove the front console box..
4. Take the shaded area shown in the figure, and remove the shift panel i ...
Other materials:
Keys
WARNING
Do not leave the key in your vehicle with children and keep them in a place where
your children will not find or play with them:
•eaving children in a vehicle with the key is
dangerous. This could result in someone being badly injured or even killed. Children
may find these keys to ...
Winter Driving
Carry emergency gear, including tire chains, window scraper, flares, a small
shovel, jumper cables, and a small bag of sand or salt.
Ask an Authorized Mazda Dealer to perform the following precautions: l Have the
proper ratio of antifreeze in the radiator.
• Inspect the battery and its cable ...
Fuel and Engine Exhaust Precautions
Fuel Requirements
Vehicles with catalytic converters or oxygen sensors must use ONLY UNLEADED FUEL,
which will reduce exhaust emissions and keep spark plug fouling to a minimum.
Your Mazda will perform best with fuel listed in the table.
Fuel with a rating lower than 87 octane (91 RON) could ...
