Mazda CX-5 Service & Repair Manual: Refrigerant Pressure Sensor Removal/Installation [Full Auto Air Conditioner]
1. Disconnect the negative battery cable..
2. Discharge the refrigerant..
3. Disconnect the refrigerant pressure sensor connector.
CAUTION:
-
If moisture or foreign material enters the refrigeration cycle, cooling ability will be lowered and abnormal noise will occur. Always immediately plug all open fittings after removing any refrigeration cycle parts to keep moisture or foreign material out of the cycle.
4. Loosen the refrigerant pressure sensor using two spanners.
5. Remove the refrigerant pressure sensor.
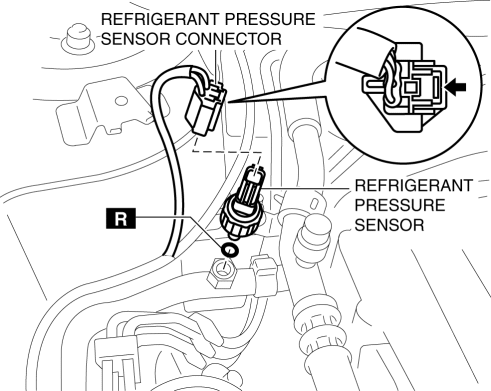
-
Tightening torque
-
10—11 N·m {102—112 kgf·cm, 89—97 in·lbf}
6. Install in the reverse order of removal..
7. Perform the refrigerant system performance test..
Refrigerant Pressure Sensor Installation Note
1. Apply compressor oil to the O-rings and connect the joints.
 Refrigerant Pressure Sensor Inspection [Manual Air Conditioner]
1. Install the manifold gauge.
2. Verify the high-pressure side reading of the manifold gauge.
3. Measure the terminal voltage at PCM terminals 2BB, 2AX and 2AJ
4. Using the graph below, measure ...
 Refrigerant Pressure Sensor Removal/Installation [Manual Air Conditioner]
1. Disconnect the negative battery cable..
2. Discharge the refrigerant..
3. Disconnect the refrigerant pressure sensor connector.
CAUTION:
If moisture or foreign material enters the ref ...
Other materials:
Discharge Headlight Control Module
Purpose
Converts DC voltage from the battery to AC voltage and outputs the stabilized
voltage to the discharge headlight.
Function
The discharge headlight control module controls the voltage from the battery
to illuminate the discharge headlight.
The discharge headl ...
Differential Oil Replacement
1. Place the vehicle on level ground.
2. Remove the filler plug.
3. Remove the drain plug and drain the differential oil into a container.
4. Install a new washer and the drain plug, and tighten.
Tightening torque
40—53 N·m {4.1—5.4 kgf·m, 30—39 ft·lbf}
5. Add the ...
Rear Door Quarter Glass Removal/Installation
1. Fully lower the rear door glass.
2. Disconnect the negative battery cable..
3. Remove the rear door trim..
4. Remove the rear door weather strip arrow (1) shown in the figure.
5. Remove the service hole cover No.1 arrow (2) shown in the figure.
CAUTION:
When removing service ...
