Mazda CX-5 Service & Repair Manual: A/C Compressor Control [Full Auto Air Conditioner]
Purpose
-
The A/C compressor control switches the A/C compressor on/off according to the vehicle environment.
Function
-
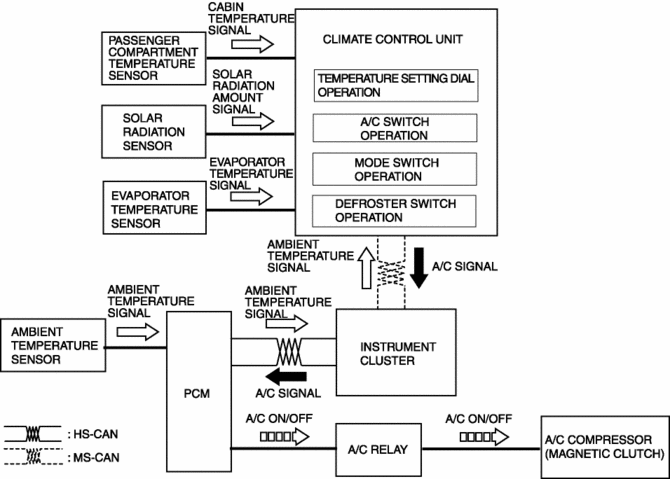
The A/C compressor control turns the A/C compressor on/off based on the climate control unit operation and signals from each sensor.
-
The A/C compressor control has automatic and manual controls.
-
The A/C compressor automatic control performs the following correction:
-
Defroster correction
A/C compressor automatic control
-
The climate control unit determines the A/C ON/OFF mode based on the ambient temperature.
-
The climate control unit determines the A/C signal on/off according to the air conditioner operation such as A/C ON mode (A/C switch ON) or AUTO mode (AUTO switch ON).
-
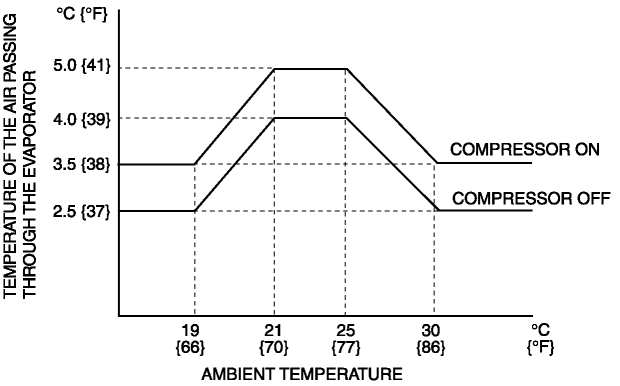
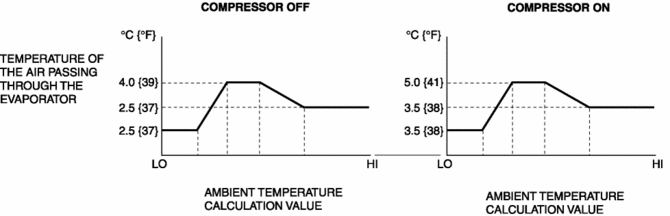
In A/C ON mode, the A/C signal (magnetic clutch) on/off is determined based on the ambient temperature and the temperature of the air passing through the evaporator.
-
In AUTO mode, the A/C signal (magnetic clutch) on/off is determined based on the ambient temperature calculation value and the temperature of the air passing through the evaporator.
-
The ambient temperature calculation value is calculated based on the ambient temperature, set temperature, cabin temperature, and sunlight intensity.
-
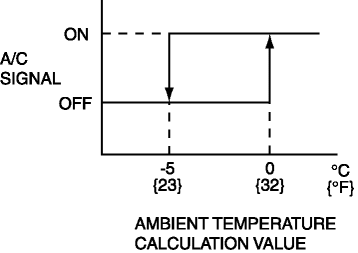
When the ambient temperature is low, the A/C signal (magnetic clutch) OFF temperature is set lower to prevent window fogging.
A/C compressor manual control
-
The climate control unit switches the A/C ON/OFF mode according to the A/C switch operation.
|
A/C mode |
Operation condition |
|
|
A/C ON mode (A/C display) |
Fixed in A/C mode. |
|
|
A/C OFF mode (No display) |
Fixed in A/C OFF mode. |
|
Correction
-
Defroster correction
-
When the defroster switch is turned on, the system is switched to A/C ON mode to improve defogging.
Construction
-
The A/C compressor control consists of the parts indicated in the following table:
|
Input device |
Control part |
Output device |
|
|
|
Operation
1. The climate control determines the A/C ON/OFF based on the operations of each switch/dial and signals from each sensor which changes according to the vehicle environment.
2. The climate control unit sends the A/C signal to the PCM according to the result of the A/C ON/OFF determination and corrections.
3. When the PCM turns the A/C relay on based on the A/C signal, the magnetic clutch of the A/C compressor turns on.
 A/C Compressor
Purpose
The A/C compressor circulates the refrigerant in the refrigerant cycle.
The A/C compressor compresses the gaseous refrigerant atomized by the evaporator,
and by pressurizing ...
 A/C Compressor Removal/Installation
1. Disconnect the negative battery cable..
2. Discharge the refrigerant..
3. Remove the front under cover No.2..
4. Remove the drive belt..
5. Disconnect the connector.
6. Remove bolts A ...
Other materials:
Brake Fluid Pressure Sensor Inspection
1. Switch the ignition to off.
2. Remove the clips.
3. Set the splash shield out of the way.
4. Disconnect the brake pipe from the LF brake hose.
5. Remove the clip.
6. Remove the LF brake hose from the bracket.
7. Detach the brake pipe from the pipe holder.
8. Install the SST ...
Brake/Taillight Bulb Removal/Installation
1. Disconnect the negative battery cable..
2. Insert a tape-wrapped flathead screwdriver into the service hole in the position
shown in the figure.
3. Move the flathead screwdriver in the direction of the arrow (1) shown in the
figure, pull out the service hole cover, and detach the serv ...
Center Roof Antenna Removal/Installation
1. Disconnect the negative battery cable..
2. Remove the following parts:
a. Front scuff plate.
b. Rear scuff plate.
c. B-pillar lower trim.
d. Front seat belt adjusting cover.
e. Front seat belt upper anchor installation bolt.
f. B-pillar upper trim.
g. Trunk board.
h. Trunk end t ...
