Mazda CX-5 Service & Repair Manual: Rear Seat Center Armrest Removal/Installation
1. Operate the push knob (RH) and lower the rear seat back (RH).
2. Remove screw A.
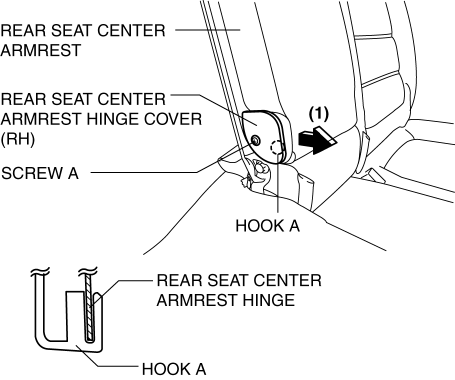
3. Remove the rear seat center armrest hinge cover (RH) in the direction of the arrow (1) shown in the figure while setting hook A aside.
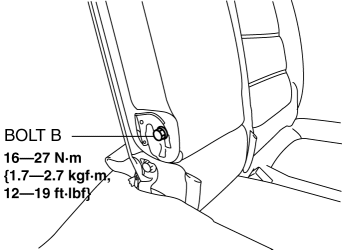
4. Remove bolt B.
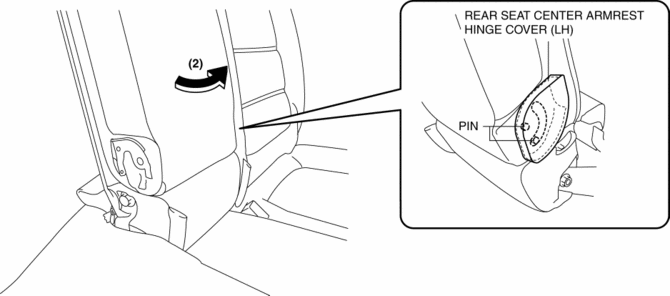
5. Remove the rear seat center armrest in the direction of the arrow (2) shown in the figure while setting the pins aside.
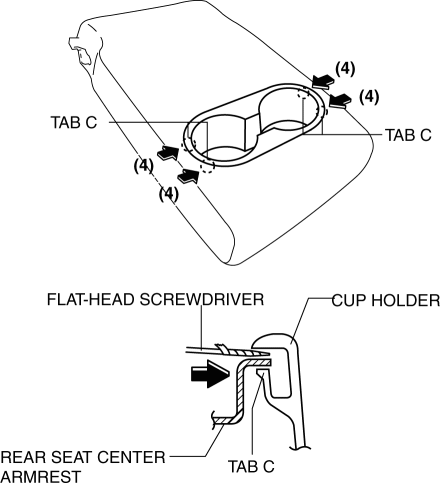
6. Using a flathead screwdriver wrapped in protective tape, insert it in the gap between the cup holder and the rear seat center armrest in the direction of the arrow (3) shown in the figure, and disengage tabs B.
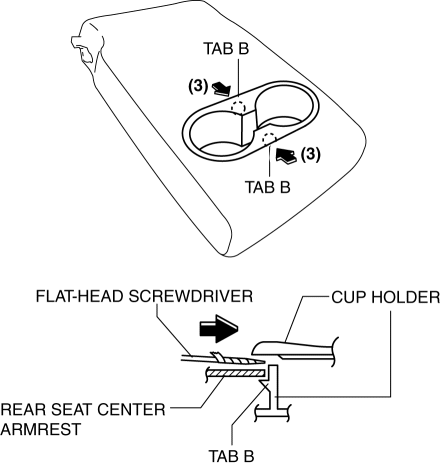
7. Using a flathead screwdriver wrapped in protective tape, insert it in the gap between the cup holder and the rear seat center armrest in the direction of the arrow (4) shown in the figure, and disengage tabs C.
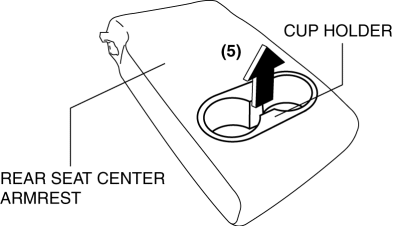
8. Remove the cup holder in the direction of the arrow (5) shown in the figure.
9. Install in the reverse order of removal.
 Rear Console Removal/Installation
1. Disconnect the negative battery cable..
2. Remove the following parts:
a. Front console box.
b. Shift lever knob (MTX).
c. Shift panel.
d. Upper panel.
3. Remove screws A.
4. Remo ...
 Sunvisor Removal/Installation
1. Disconnect the negative battery cable. (with vanity mirror illumination).
2. Remove the screw A.
3. Rotate the sunvisor in the direction of the arrow.
4. Unhook and remove the sunvisor. ...
Other materials:
Air Bag System Warning Light [Two Step Deployment Control System]
Purpose
The air bag system warning light notifies the driver of a malfunction in
the SRS air bag system.
Function
If a malfunction occurs in the SRS air bag system, the air bag system warning
light illuminates or flashes.
Construction
LEDs (light-emitting d ...
Power Steering Malfunction Indicator Light
Purpose
The power steering malfunction indicator light warns the driver that there
is a malfunction with the electric power steering (EPS) system.
Function
If there is a malfunction in the EPS system, the power steering malfunction
indicator light illuminates.
If th ...
Ambient Temperature Sensor [Full Auto Air Conditioner]
Purpose
The ambient temperature sensor detects the ambient temperature.
Function
The ambient temperature sensor converts the detected temperature to an electric
signal.
Construction
A thermistor-type ambient temperature sensor has been adopted.
The ambient ...
