Mazda CX-5 Service & Repair Manual: Rear Seat Belt Removal/Installation
CAUTION:
-
The ELR (emergency locking retractor) has a spring that will unwind if the retractor cover is removed. The spring cannot be rewound by hand. If this occurs, the ELR will not work properly. Therefore, do not disassemble the retractor.
1. Remove the following parts:
a. Trunk board.
b. Trunk end trim.
c. Rear scuff plate.
d. Trunk side trim.
e. D-pillar trim.
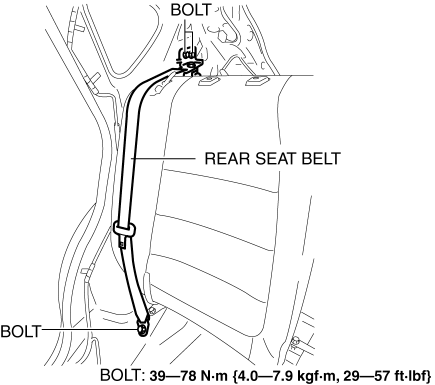
2. Remove the bolts.

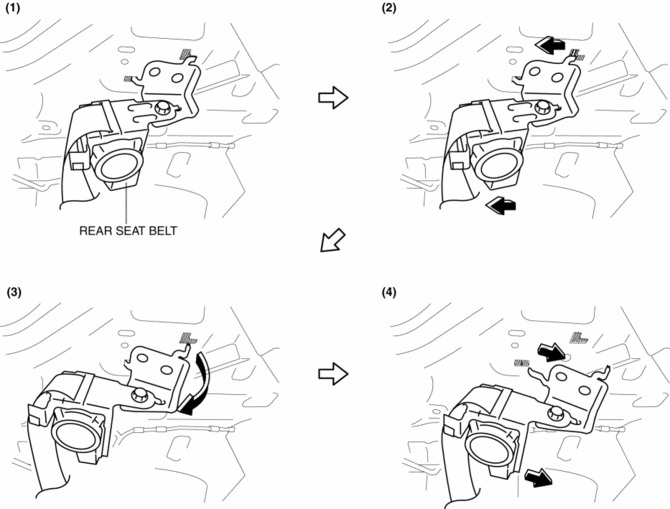
3. Remove the tab as shown in the figure.

4. Remove the rear seat belt.
5. Install in the reverse order of removal.
 Rear Buckle Removal/Installation
1. Switch the ignition to off.
2. Disconnect the negative battery cable and wait for 1 min or more..
3. Press the release switch, then disconnect the rear center seat belt and rear
buckle.
...
 Seat Belt
Outline (Standard Deployment Control System)
Three-point front seat belts with the following functions for front seat
passengers adopted.
ELR (Emergency Locking Retractor: emerg ...
Other materials:
Rear Window Glass Installation
WARNING:
Using a utility knife with bare hands can cause injury. Always wear gloves
when using a utility knife.
CAUTION:
Proper installation of the glass may be difficult if sealant is cracked or
the glass is pushed out by air pressure when a door is opened/closed with al ...
Rear Seat Cushion Removal/Installation
CAUTION:
When removing or putting in the rear seat cushion, contact with the surrounding
areas of the vehicle could cause scratches and damage. When removing or putting
in the rear seat cushion, always use two or more persons to perform the work
and be careful not to scratch or dama ...
M Position Switch Inspection [Fw6 A EL, Fw6 Ax EL]
Continuity Inspection
NOTE:
The M position switch is built into the selector lever component.
1. Disconnect the negative battery cable..
2. Remove the front console..
3. Disconnect the selector lever component connector.
4. Verify that the continuity between selector lever c ...
