Mazda CX-5 Service & Repair Manual: Rear Sash Molding Removal
WARNING:
-
Using a utility knife with bare hands can cause injury. Always wear gloves when using a utility knife.
1. Remove the rear door garnish. (rear side).
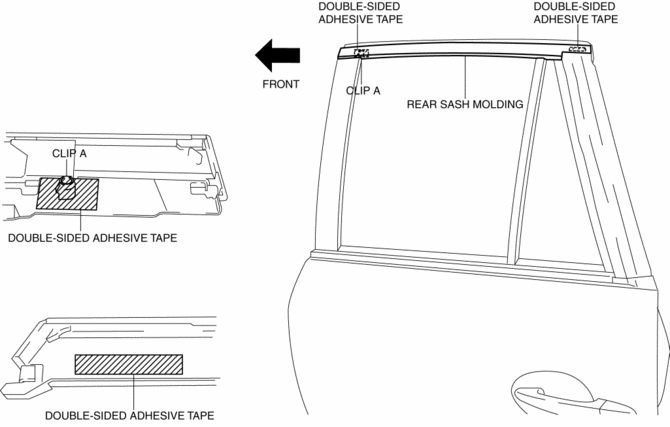
2. Remove the double-sided adhesive tape in the position shown in the figure using the utility knife.
CAUTION:
-
When remove the double-sided adhesive tape, be careful not to damage clip A.

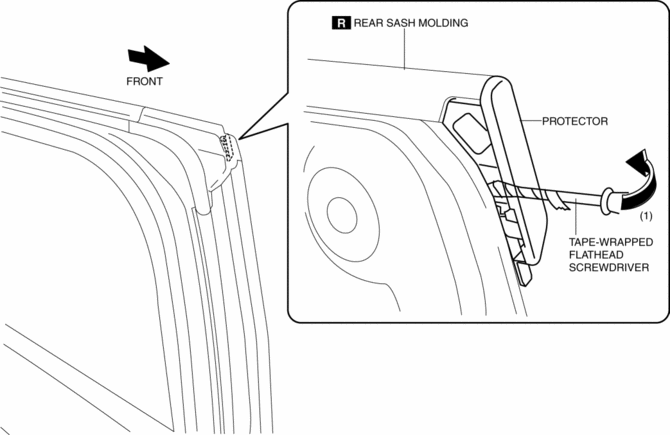
3. Insert a tape-wrapped flathead screwdriver shown in the figure and remove the protector in the direction of arrow (1).

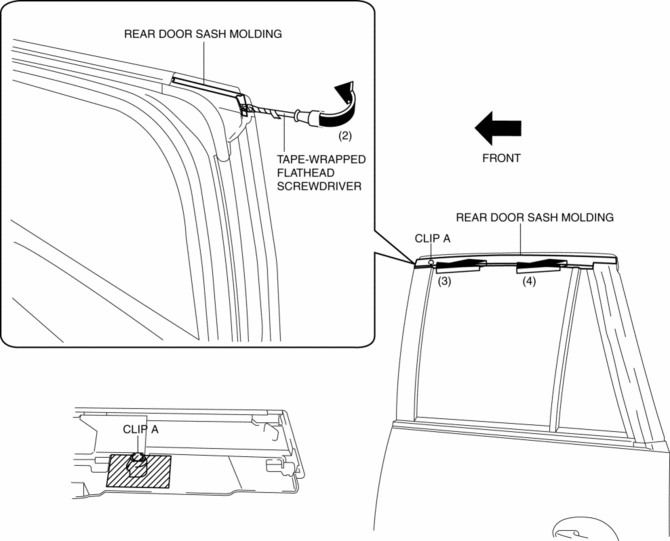
4. Insert a tape-wrapped flathead screwdriver shown in the figure and remove clips A in the direction of arrow (2).

5. Remove the rear sash molding in the direction of arrow in the order of (3), (4) shown in the figure.
 Rear Sash Molding Installation
WARNING:
Using a utility knife with bare hands can cause injury. Always wear gloves
when using a utility knife.
NOTE:
Double-sided adhesive tape has already been attached to t ...
 Rear Side Panel Installation [Panel Replacement]
Symbol Mark
Installation Procedure
1. When installing new parts, measure and adjust the body as necessary to conform
with standard dimensions.
2. Drill holes for the plug welding before inst ...
Other materials:
Driveline/Axle Abbreviations
AAS
Active Adaptive Shift
ABS
Antilock Brake System
ABDC
After Bottom Dead Center
ACC
Accessories
AFS
Adaptive Front Lighting System
ALC
...
Clutch Release Cylinder Removal/Installation [C66 M R]
CAUTION:
Do not allow clutch fluid to get on a painted surface. Clutch fluid contains
properties which can dissolve the paint. If clutch fluid gets on a painted surface,
wash it off with water immediately and wipe the area off completely.
1. Remove the front under cover No.2..
...
Positive Crankcase Ventilation (PCV) Valve Inspection
Airflow Inspection
1. Disconnect the section (A) of ventilation hose shown in the figure.
2. Start the engine and verify that vacuum is applied to the end of the disconnected
ventilation hose while the engine is idling.
If vacuum is not applied to the ventilation hose, perform the p ...
