Mazda CX-5 Service & Repair Manual: Rear Brake (Disc) Removal/Installation
1. Loosen the adjusting nut..
2. Remove in the order indicated in the table.
3. Install in the reverse order of removal.
4. After installation, add brake fluid, bleed the air, and inspect for fluid leakage..
5. Pump the brake pedal a few times and inspect the following:
-
The disc pad projection is securely installed to the piston groove
-
Parking brake lever stroke
-
Brake drag
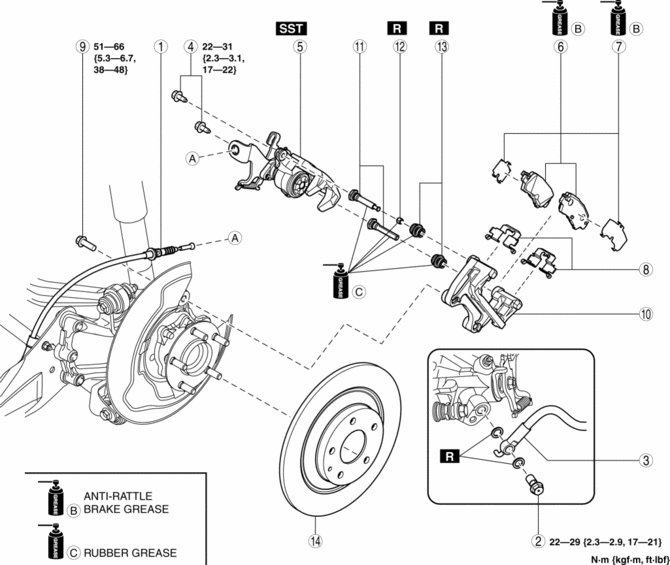
|
1 |
Rear parking brake cable (See Rear Parking Brake Cable Installation Note.) |
|
2 |
Bolt |
|
3 |
Brake hose |
|
4 |
Bolt |
|
5 |
Caliper (See Caliper Installation Note.) |
|
6 |
Disc pad |
|
7 |
Shim |
|
8 |
Guide plate |
|
9 |
Bolt |
|
10 |
Mounting support |
|
11 |
Slide pin |
|
12 |
Bushing |
|
13 |
Dust boot |
|
14 |
Disc plate |
Caliper Installation Note
1. Clean the exposed area of the piston.
2. Rotate the piston clockwise slowly using the SST and push the piston completely until the piston grooves are in the position shown in the figure.
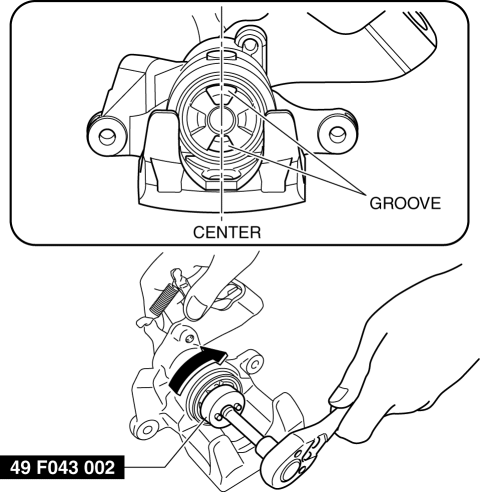
3. Install the caliper.
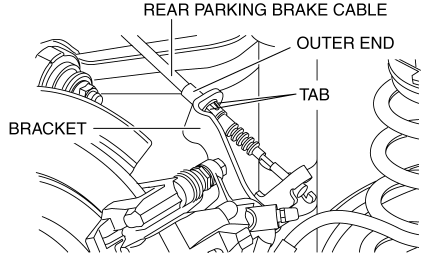
Rear Parking Brake Cable Installation Note
1. Install the rear parking brake cable to the rear caliper.
2. Verify that the outer end tabs of the rear parking brake cable is securely engaged with the bracket.
 Rear Brake (Disc) Inspection
Brake Judder Repair Hints
Description
1. Brake judder concern has the following 3 characteristics:
Steering wheel vibration
1. The steering wheel vibrates in the rotation direction. This characte ...
 Parking Brake
...
Other materials:
Planetary Gear [Fw6 A EL, Fw6 Ax EL]
Purpose/Function
The planetary gear is a mechanism which shifts the drive force from the engine.
The planetary gear consists of multiple gears which rotate individually while
revolving. By controlling the individual rotation and revolving of the gears,
the transaxle performs gear shi ...
Cylinder Block
Purpose, Function
The cylinder block forms the cylinder and crankcase.
Construction
The cylinder block consists of the upper cylinder block and lower cylinder
block.
The cylinder block is an open deck type with excellent cooling performance.
The lightweight cyl ...
Hood Adjustment
Height Difference Adjustment
1. Verify that the height difference between the hood and the body is within
the specification.
Standard clearance
a: 2.7—6.9 mm {0.11—0.27 in}
b: 4.1—8.0 mm {0.17—0.31 in}
2. Disconnect the negative battery cable..
3. Remove the ...
