Mazda CX-5 Service & Repair Manual: Rear Lower Arm Removal/Installation
WARNING:
-
Be careful not to allow the coil spring to fly off when removing/installing the coil spring. Otherwise, the coil spring could fly off and cause serious injury or death, or damage to the vehicle.
1. When working on the left side of the vehicle, disconnect the auto leveling sensor link..
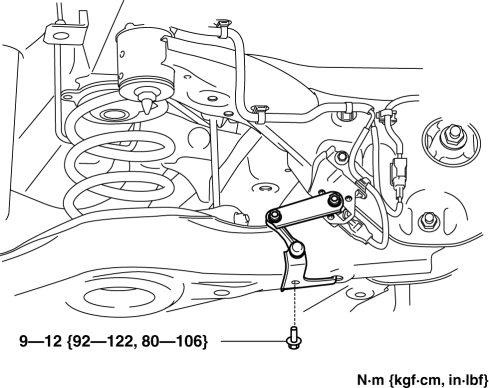
2. Remove in the order indicated in the table.
3. Install in the reverse order of removal.
4. Inspect the wheel alignment and adjust it if necessary..

|
1 |
Rear stabilizer control link lower side nut (See REAR STABILIZER REMOVAL/INSTALLATION [2WD].) (See REAR STABILIZER REMOVAL/INSTALLATION [AWD].) |
|
2 |
Rear lower arm outer bolt (See Rear Lower Arm Outer Bolt Removal Note.) (See Rear Lower Arm Outer Bolt Installation Note.) |
|
3 |
Rear coil spring component (See REAR COIL SPRING REMOVAL/INSTALLATION.) |
|
4 |
Rear lower arm inner nut |
|
5 |
Rear lower arm |
Rear Lower Arm Outer Bolt Removal Note
1. Support the rear lower arm using a jack.
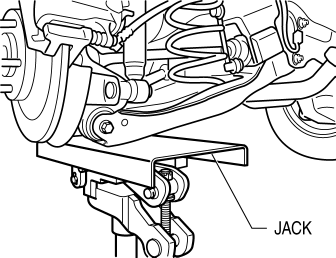
2. Remove the rear lower arm outer bolt.
Rear Lower Arm Outer Bolt Installation Note
1. Position the jack under the rear lower arm and jack up slowly.
2. Align the upper end of the rear coil spring with the step of the upper spring seat rubber.
3. Align the lower end of the rear coil spring with the step of the lower spring seat rubber.
4. Install the lower arm outer bolt.
 Rear Lateral Link Removal/Installation
1. Disconnect the rear stabilizer control link lower side nut..
2. Remove in the order indicated in the table.
3. Install in the reverse order of removal.
4. Inspect the wheel alignment an ...
 Rear Shock Absorber Disposal
WARNING:
Whenever drilling into a rear shock absorber, wear protective eye wear. The
gas in the rear shock absorber is pressurized, and could spray metal chips into
the eyes and face w ...
Other materials:
Outside the United States/Canada
Government regulations in the United States/Canada require that automobiles meet
specific emission regulations and safety standards. Therefore, vehicles built for
use in the United States/Canada may differ from those sold in other countries.
The differences may make it difficult or even impossi ...
Main Fuse
Purpose
If electric current of the specified value or more flows to each fuse, the
fuse melts due to heat generation to protect the systems and parts downstream
of the fuse.
Function
If electric current to each fuse is the specified value or more, the fuse
melts due to h ...
Auxiliary Jack/Usb Port
NOTE:
“iPod” is a registered trademark of Apple Inc. in the United States and other
countries.
Purpose, Function
The Auxiliary jack/USB port outputs the audio signals of commercially-available
portable audio, a USB device, or an iPod connected to the Auxiliary jack/USB ...
