Mazda CX-5 Service & Repair Manual: Rear Coil Spring Removal/Installation
WARNING:
-
Be careful not to allow the coil spring to fly off when removing/installing the coil spring. Otherwise, the coil spring could fly off and cause serious injury or death, or damage to the vehicle.
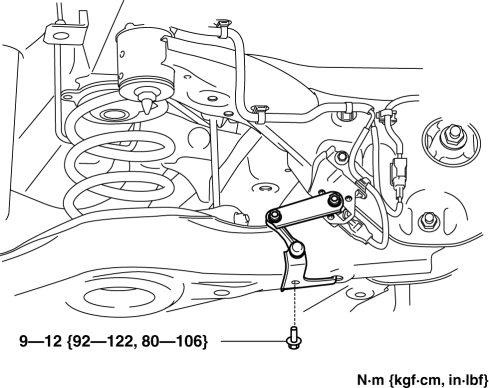
1. When working on the left side of the vehicle, disconnect the auto leveling sensor link..
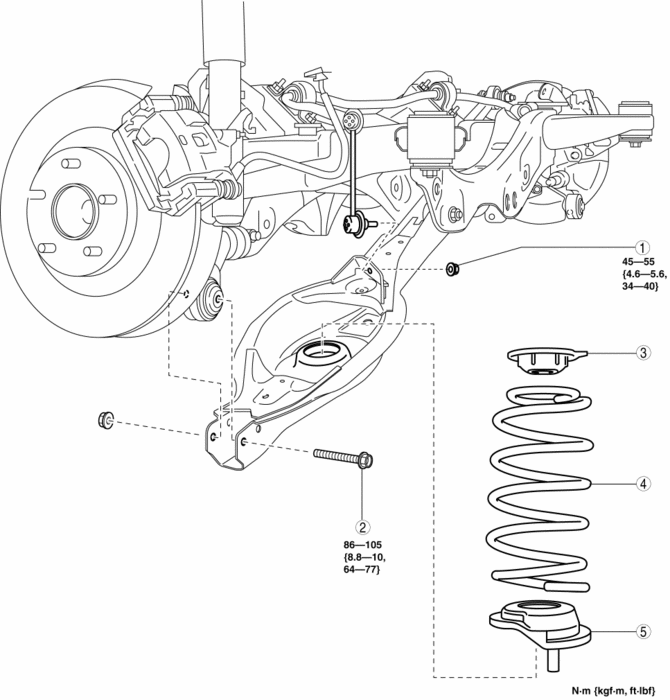
2. Remove in the order indicated in the table.
3. Install in the reverse order of removal.
4. Inspect the wheel alignment and adjust it if necessary..
|
1 |
Rear stabilizer control link lower side nut |
|
2 |
Rear lower arm outer bolt (See Rear Coil Spring Removal Note.) |
|
3 |
Upper spring seat rubber |
|
4 |
Rear coil spring (See Rear Coil Spring Installation Note.) |
|
5 |
Lower spring seat rubber |
Rear Coil Spring Removal Note
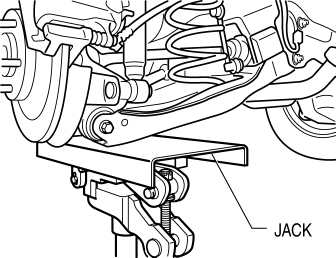
1. Support the rear lower arm using a jack.
2. Remove the rear lower arm outer bolt.
3. Remove the rear coil spring.
Rear Coil Spring Installation Note
1. Position the jack under the rear lower arm and jack up slowly.
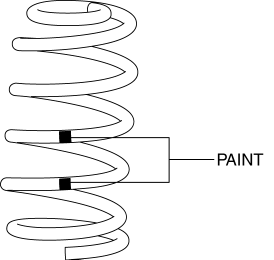
2. Install the rear coil spring so that the light green paint is pointed upward of the vehicle.
3. Align the upper end of the rear coil spring with the step of the upper spring seat rubber.
4. Align the lower end of the rear coil spring with the step of the lower spring seat rubber.
5. Install the rear lower arm outer bolt.
 Rear Axle
Purpose, Function
An angular ball bearing, with a low rotational resistance, has been adopted,
improving driveability.
A unit bearing that does not require pre-load setting has bee ...
 Rear Drive Shaft
Purpose, Function
Engine noise and vibration have been reduced due to adoption of a bell joint
on the wheel side of the constant velocity joint.
A low noise and vibration double of ...
Other materials:
Plug Hole Plate Removal/Installation
CAUTION:
If the rubber on only one side of the plug hole plate front is lifted up,
it could damage the adapter at the location shown in the figure. When removing
the plug hole plate, lift up the rubbers at the same time.
Removal
1. Pull up the front part of the plug hole p ...
Turbine/Input Shaft Speed Sensor, Output Shaft Speed Sensor [Fw6 A EL, Fw6 Ax
EL]
Purpose/Function
The turbine/input shaft speed sensor detects the rotation speed of the input
shaft (low clutch drum).
The output shaft speed sensor detects the rotation speed of the output shaft
(primary gear).
The turbine/input shaft speed sensor and output shaft speed ...
Accessory Socket
Purpose
By inserting the plug of an electrical device, 12 V (maximum 120 W) of power
is supplied enabling use of the electrical device in the vehicle.
Function
Front accessory socket
When the ignition is switched to ACC or ON (engine off or on), 12 V (maximum
120 W) of pow ...
