Mazda CX-5 Service & Repair Manual: Pre Tensioner Seat Belt [Two Step Deployment Control System]
Purpose
-
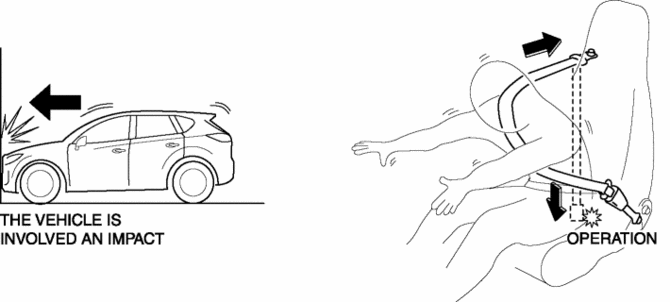
The pre-tensioner seat belt retracts and tightens the seat belt webbing to protect the front passengers during a collision.
Function
-
The pre-tensioner seat belts operate (deploy) based on the operation signal from the SAS control module to instantly retract and tighten the belt webbing, restraining the driver and front passenger.
Construction
-
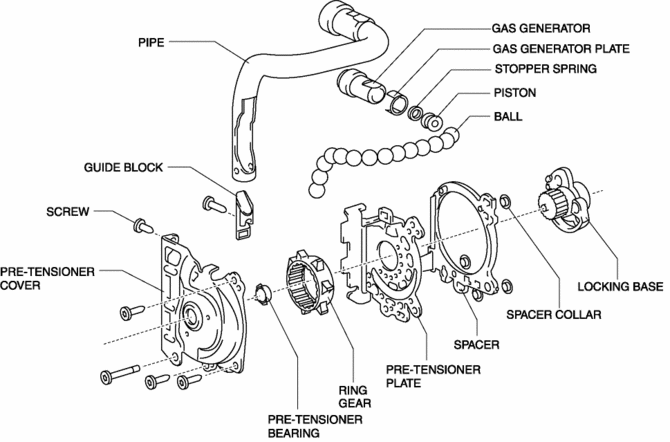
The pre-tensioner seat belt is installed to the front seat belt retractor.
-
The pre-tensioner seat belt consists of the following parts shown in the figure:
Operation
Normal operation (pre-tensioner non-operation)
-
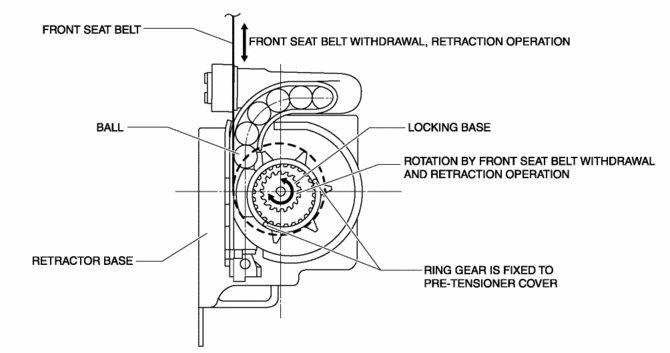
Normally, there is a gap between the locking base and the ring gear.
-
The ring gear rotates in conjunction with the withdrawal and retraction of the front seat belts, however, in the pre-tensioner part it is kept separated.
Pre-tensioner activation
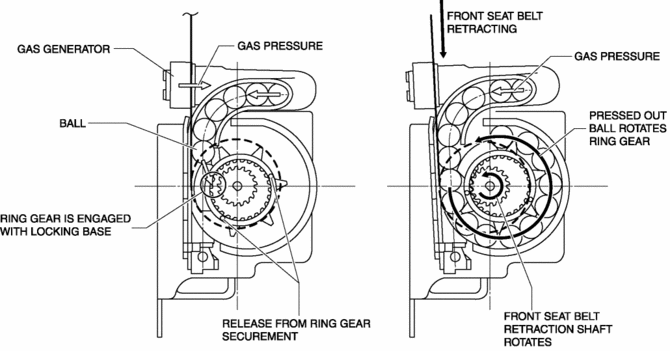
1. The gas generator produces gas when it receives an operation signal from the SAS control module.
2. The ball in the cylinder is pressed by the gas pressure and the ring gear is removed from its securement.
3. The ring gear is engaged with the locking base and the force of the ball being pressed out is transmitted to the retraction shaft.
4. The front seat belt is retracted in conjunction with the rotation of the retraction shaft.
Fail-safe
-
Function not equipped.
 Pre Tensioner Seat Belt [Standard Deployment Control System]
Purpose
The pre-tensioner seat belt retracts and tightens the seat belt webbing to
protect the front passengers during a collision.
Function
The pre-tensioner seat belts operate ...
 Rear Buckle Removal/Installation
1. Switch the ignition to off.
2. Disconnect the negative battery cable and wait for 1 min or more..
3. Press the release switch, then disconnect the rear center seat belt and rear
buckle.
...
Other materials:
Electric Power Steering System
Outline
A column assist type EPS has been adopted for all models.
EPS provides smooth handling from low to high speeds as a result of the excellent
steering feel provided by the electronic control and the vehicle-speed responsive
control.
EPS does not require a power ste ...
Transfer Oil Inspection [Fw6 Ax EL]
1. Park the vehicle on level ground.
2. Remove the oil level plug with the washer.
3. Checking by hand, verify that the oil is near the brim of the plug hole.
If the oil level is low, add the specified amount and type of oil through
the oil level plug hole.
Transfer oil
...
Front Door Latch Switch Inspection
1. Perform the front door glass preparation..
2. Disconnect the negative battery cable..
3. Remove the following parts:
a. Inner garnish.
b. Front door trim.
c. Front door glass.
d. Front door module panel.
e. Front door key cylinder.
f. Front door latch and lock actuator.
4. Verif ...
