
Mazda CX-5 Service & Repair Manual: Passenger Sensing System [Two Step Deployment Control System]
Purpose
-
The passenger sensing system detects whether or not there is an occupant on the passenger seat to control the operation (deployment) of the passenger-side air bag system corresponding to the detected condition.
Function
-
Measures the total seated weight on the passenger-side seat, determines whether there is an adult or child present (including a child-restraint seat), or that it is empty, and then controls operation (deployment) or non-operation (non-deployment) of the passenger-side air bag module, pre-tensioner seat belt and lap pre-tensioner seat belt.
Construction
-
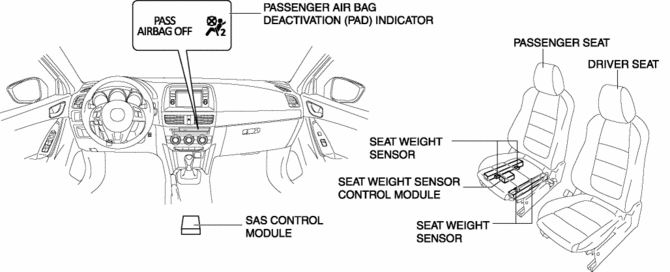
Consists of seat weight sensors installed above the passenger-side seat rails, a seat weight sensor control module installed on the back side of the passenger-side seat cushion, the PAD indicator (information display), and SAS control module installed in the console.
Operation
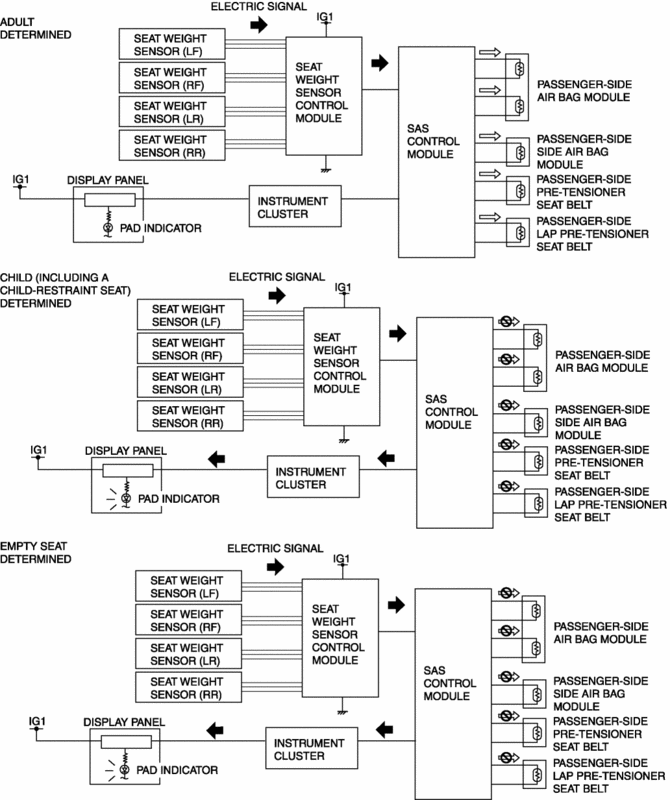
1. The load on the passenger-side front seat is converted into an electric signal by the strain gauge built into the seat weight sensor, and this signal is sent to the seat weight sensor control module.
2. The electronic signals from the four seat weight sensor are used for calculation by the seat weight sensor control module, which divides the result and then determines whether there is an adult or child (including a child-restraint seat) in the passenger-side seat, or that it is empty. The determined result is sent to the SAS control module.
3. The SAS control module performs control based on this determined result as shown in the following table when the module detects a level of impact requiring operation (deployment).
?: Possible-: Not possible|
Determined result |
Determined weight |
Passenger-side air bag module operation (deployment) |
Passenger-side side air bag module operation (deployment) |
Passenger-side pre-tensioner seat belt operation (deployment) |
Passenger-side lap pre-tensioner seat belt operation (deployment) |
PAD indicator |
|
Adult |
Approx. 42 kg {93 lb} or more*1 |
? |
? |
? |
? |
Not illuminated |
|
Child (including child-restraint seat) |
Approx. 30 kg {66 lb} or less*1 |
- |
- |
- |
- |
Illuminated |
|
Empty |
Approx. 0 kg {0 lb} |
- |
- |
- |
- |
Illuminated |
NOTE:
-
The passenger-side air bag module, the passenger-side side air bag module and the passenger-side pre-tensioner seat belt system will be turned off as the total seated weight drops toward 30 kg {66 lb}
and they will be turned on again before the weight exceeds 42 kg {93 lb}
.
CAUTION:
-
If any of the following work is performed, perform the seat weight sensor calibration using the Mazda Modular Diagnostic System (M-MDS).
-
Replacement with a new seat weight sensor
-
Replacement with a new seat weight sensor control module
-
Replacement with new passenger-side seat parts
-
Disassembly of the passenger-side seat
-
If any of the following work is performed, perform the seat weight sensor inspection using the Mazda Modular Diagnostic System (M-MDS).
-
Removal of the passenger-side seat
-
Loosening and retightening of passenger-seat fixing bolts
-
Or, the vehicle is involved in a collision
 Passenger Air Bag Deactivation (Pad) Indicator Light Removal/Installation [Two
Step Deployment Control System]
Passenger Air Bag Deactivation (Pad) Indicator Light Removal/Installation [Two
Step Deployment Control System]
NOTE:
The PAD indicator light (LED) is built into the display panel.
1. Remove the climate control unit. (with full-auto air conditioner).
2. Remove the clock. (with manual air conditi ...
 Passenger Side Air Bag Module Removal/Installation [Standard Deployment Control
System]
Passenger Side Air Bag Module Removal/Installation [Standard Deployment Control
System]
WARNING:
Handling the air bag module improperly can accidentally deploy the air bag
module, which may seriously injure you. Read the air bag system service warnings
and cautions before h ...
Other materials:
Power Brake Unit
Purpose/Function
A 9.8-inch, single diaphragm type power brake unit has been adopted, achieving
compatibility between high braking performance and excellent brake feeling.
Construction
The power brake unit cannot be disassembled. Therefore, if there is any malfunction
in th ...
Door Lock Switch Removal/Installation
Driver's Side
NOTE:
The driver's side door lock switch cannot be removed as a single unit because
it is built into the power window main switch. If the driver's side door lock
switch is replaced, replace the power window main switch..
Passenger's Side
1. Disconn ...
Brake Pedal Inspection
Pedal Height Inspection
1. Measure the distance from the center of the upper surface of the pedal pad
to the insulator and verify that it is as specified.
If not within the specification, inspect the following items and repair or
replace the applicable part if there is any malfunct ...
