Mazda CX-5 Service & Repair Manual: Passenger Compartment Temperature Sensor Removal/Installation [Full Auto Air Conditioner]
1. Disconnect the negative battery cable..
2. Remove the following parts:
a. Front scuff plate (driver-side).
b. Front side trim (driver-side).
c. Switch panel.
d. Decoration panel.
e. Shift lever knob (MTX).
f. Front console box.
g. Shift panel.
h. Upper panel.
i. Rear console.
j. Side wall.
k. Front console.
l. Hood release lever from the lower panel.
m. Lower panel (driver-side).
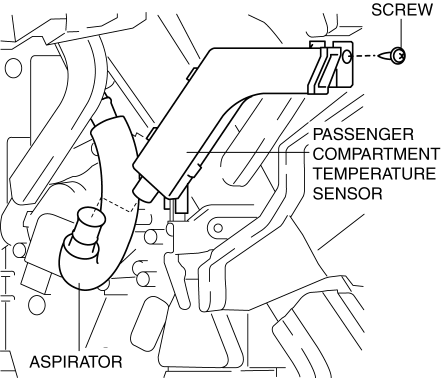
3. Remove the aspirator..

4. Remove the screw.
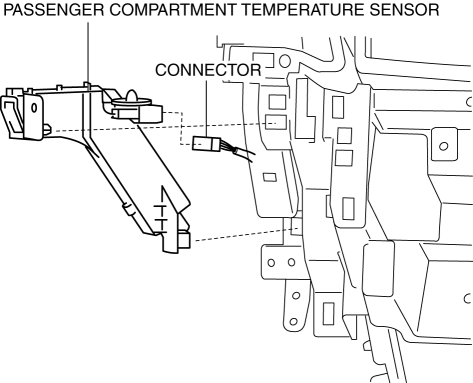
5. Disconnect the connector.

6. Remove the passenger compartment temperature sensor.
7. Install in the reverse order of removal.
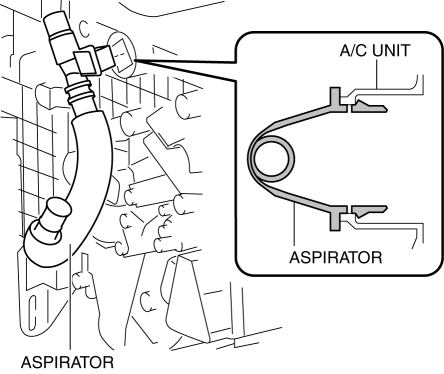
Aspirator Removal Note
1. Remove the aspirator as shown in the figure.

 Passenger Compartment Temperature Sensor Inspection [Full Auto Air Conditioner]
1. Measure the temperature around the passenger compartment temperature sensor
and measure the resistance between passenger compartment temperature sensor terminals
A and B.
If the charact ...
 Passenger Compartment Temperature Sensor [Full Auto Air Conditioner]
Purpose
The passenger compartment temperature sensor detects the cabin temperature.
Function
The passenger compartment temperature sensor converts the detected temperature
to an ...
Other materials:
Throttle Body Inspection
Resistance Inspection
1. Disconnect the negative battery cable..
2. Disconnect the throttle body connector.
3. Measure the resistance between throttle body terminals E and F.
Throttle body resistance
1.38 ohms [20°C {68 °F}]
If not as specified, replace the throttle ...
High Pressure Fuel Pump
Purpose, Function
Applies pressure to fuel sent from the fuel pump equipped on the fuel tank,
and then pumps it to the fuel delivery pipe.
Fuel is sectioned and pumped by the up and down movement of the piston caused
by the rotation of the cam installed to the rear end of the ex ...
Body Sealing [Water Proof And Rust Preventive]
Sealant is applied to the parts where the panels meet and to the hemmed parts
of the door panel and hood panel to provide water proofing and rust proofing.
...
