Mazda CX-5 Service & Repair Manual: Oil Seal (Control Valve Body) Replacement [Fw6 A EL, Fw6 Ax EL]
1. Disconnect the negative battery cable..
2. Remove the air cleaner component..
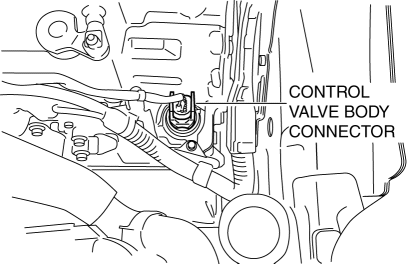
3. Disconnect the control valve body connector.
CAUTION:
-
Make sure that your hand does not touch the terminal as the connector terminal could be damaged.
-
Water or foreign objects entering the connector can cause a poor connection or corrosion. Be sure not to drop water or foreign objects on the connector when disconnecting it.
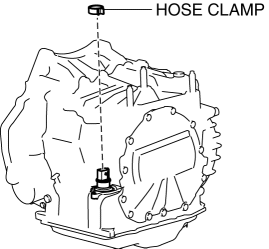
4. Remove the hose clamp.
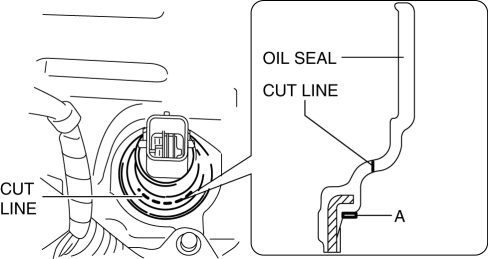
5. Cut the oil seal using a utility knife as shown in the following illustration.

CAUTION:
-
Do not damage the transaxle case.
-
Do not damage the control valve body coupler connector.
-
To prevent foreign matter penetration, clean the oil seal area thoroughly and cut the oil seal so as not to leave cutting fragments.
6. Using a tape-wrapped flathead screwdriver, remove the oil seal from the transaxle case.

NOTE:
-
Remove the oil seal by tapping the tip of a tape-wrapped flathead screwdriver on the inner circumference surface A area of the oil seal.
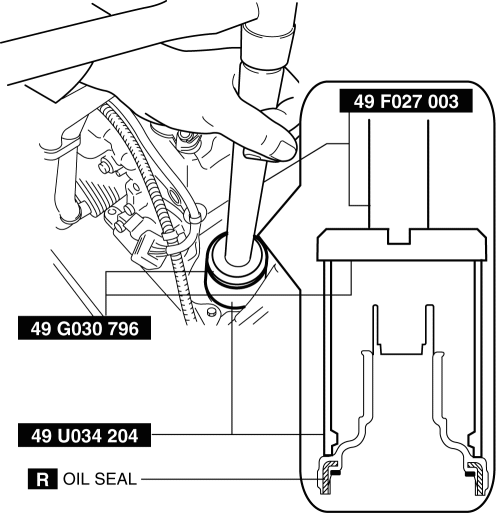
7. Temporarily install the oil seal (control valve body) by hand.
8. Using the SSTs
and a hammer, install the oil seal (control valve body) so that it is not tilted and there is no height difference between the transaxle case surface and the end surface of the oil seal.
CAUTION:
-
When installing the oil seal (control valve body), do not mistakenly hit the control valve body connector with the hammer. Otherwise the control valve body connector could be damaged making it no longer waterproof.
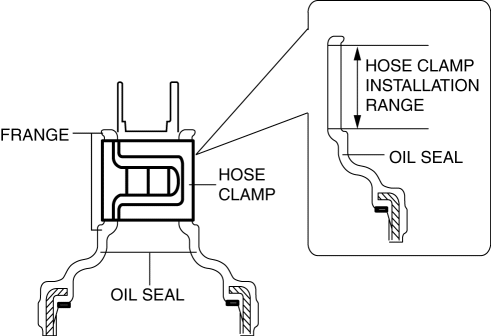
9. Install a new hose clamp to the position shown in the figure.
CAUTION:
-
If the hose clamp is reused it could cause ATF leakage, therefore use a new hose clamp.
-
Install the hose clamp tab to within the range shown in the figure.
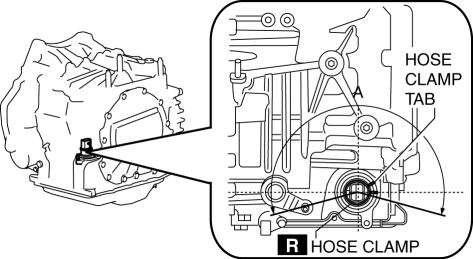
A: 210°
-
Install the hose clamp so that it does not interfere with the top and bottom flanges of the oil seal to maintain the waterproofing integrity.
10. Connect the control valve body connector.
CAUTION:
-
Make sure that your hand does not touch the terminal as the connector terminal could be damaged.
-
Verify that there is no fluid or foreign matter adhering to the connector before connecting the connector.
-
Insert the connector straight as the connector terminal could be damaged.
-
Rotate the connector lever until a click is heard.
11. Install the air cleaner component..
12. Connect the negative battery cable..
 Oil Pump
Outline
The oil pump has a mechanism for feedback control of oil pressure. As a result,
an oil pressure increase of more than the set pressure is suppressed and oil
pump drive resistance ...
 Oil Seal (Coupling Component) Replacement
1. Drain the differential oil into a container.
2. Remove the coupling component..
3. Remove the oil seal from the differential carrier using a screwdriver or similar
tool.
4. Apply differenti ...
Other materials:
Filament Inspection
1. Switch the ignition ON (engine off).
2. Turn the rear window defroster switch on.
CAUTION:
Directly touching the rear window defroster filament with the lead of the
tester could damage it. Wrap aluminum foil around the end of the lead and inspect
the filament by touching it ...
Catch Tank
Purpose, Function
Suppresses pulsation occurring before evaporative gas is inducted into the
intake manifold.
Construction
The catch tank is installed in the engine compartment.
Operation
When evaporative gas flows from the charcoal canister to the purge sol ...
Check Valve Removal/Installation
Except U.S.A. And CANADA
1. Remove the floor under cover..
2. Remove in the order indicated in the table.
1
Evaporative hose
2
Check valve
3. Install in the reverse order of removal. ...
