Mazda CX-5 Service & Repair Manual: Front Door Key Cylinder Removal/Installation
1. Disconnect the negative battery cable..
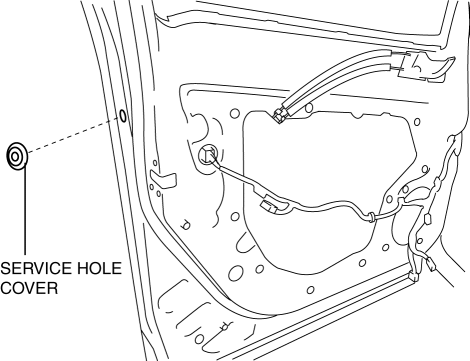
2. Remove the service hole cover.
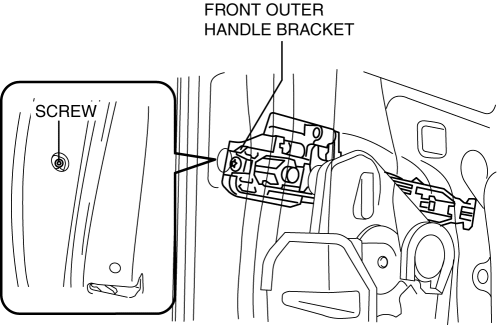
3. Detach the screw from the front door key cylinder.
NOTE:
-
The screw cannot be removed because the front outer handle bracket has a stopper which prevents the screw from falling.
4. While pressing the outer handle bracket tab in the direction of arrow (1) shown in the figure, pull the front door key cylinder in the direction of arrow (2) to detach the outer handle bracket and the front door key cylinder.
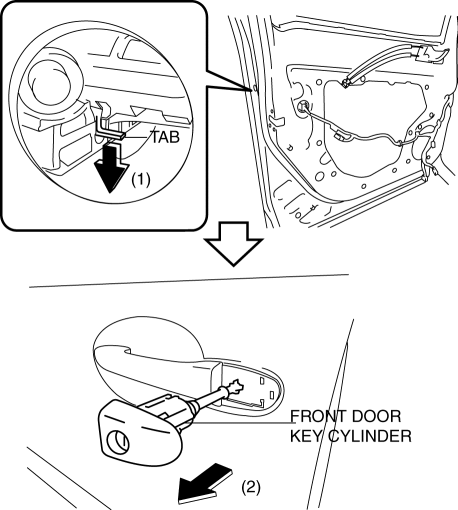
5. Remove the front door key cylinder from the outer handle bracket.
6. Insert a tape-wrapped flathead screwdriver into the position shown in the figure.
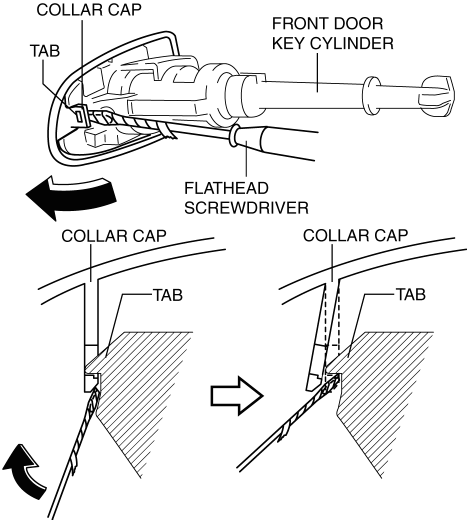
7. Move the tape-wrapped flathead screwdriver in the direction of the arrow shown in the figure to lift up the collar cap, and detach the collar cap from the front door key cylinder tab.
8. Remove the collar cap from the front door key cylinder.
9. Install in the reverse order of removal.
 Front Door Hinge Removal/Installation
1. Disconnect the negative battery cable..
2. Remove the following parts:
a. Front bumper.
b. Front combination light.
c. Front bumper slider.
d. Front over fender.
e. Front fender panel. ...
 Front Door Key Cylinder Switch Inspection
1. Perform the front door glass preparation..
2. Disconnect the negative battery cable..
3. Remove the following parts:
a. Inner garnish.
b. Front door trim.
c. Front door key cylinder.
d. ...
Other materials:
Front Side Frame (Partial Cutting) Installation [Panel Replacement]
Symbol Mark
Installation Procedure
CAUTION:
The cut and joint area indicates the maximum size range of the installation
position.
1. Drill holes for the plug welding before installing the new parts.
2. When installing the new parts, trial-fit new and existing parts, and then ...
Power Window Regulator
Purpose
The power window regulator moves the carrier plate up and down to open/close
the door glass using the rotation force transmitted from the power window motor.
Function
The power window regulator transmits the rotation force from the power window
motor to the inner wi ...
Refrigerant Pressure Sensor Inspection [Manual Air Conditioner]
1. Install the manifold gauge.
2. Verify the high-pressure side reading of the manifold gauge.
3. Measure the terminal voltage at PCM terminals 2BB, 2AX and 2AJ
4. Using the graph below, measure and verify the terminal voltage at 2AX.
5. Follow the PCM inspection when measuring the other ter ...
