Mazda CX-5 Service & Repair Manual: Oil Control Valve (OCV) [Skyactiv G 2.0]
Purpose, Function
-
The OCV switches the oil passage to the hydraulic variable valve timing actuator to control the opening/closing period of the exhaust valve.
Construction
-
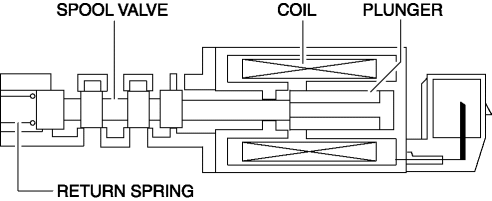
The OCV is installed to the exhaust camshaft cap (No.1).
-
The OCV consists of a spool valve which switches the engine oil passage and a plunger, coil, and return spring which operate the spool valve.
Operation
At retard
-
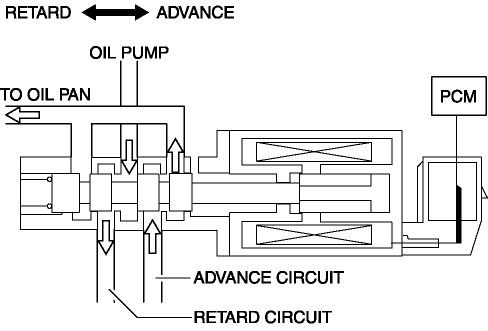
The spool valve is moved to the retard side by the signal from the PCM and engine oil is lead to the retard oil passage of the exhaust camshaft.
At advance
-
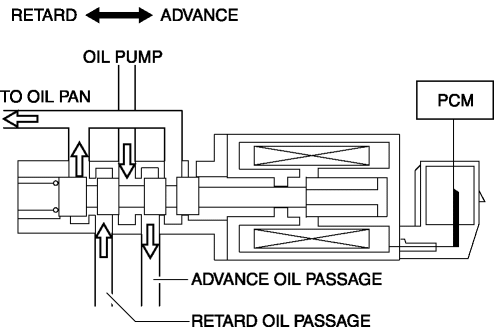
The spool valve is moved to the advance side by the signal from the PCM and engine oil is lead to the advance oil passage of the exhaust camshaft.
Middle point maintenance
-
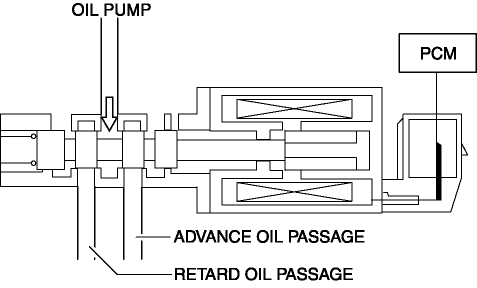
The spool valve is moved to the closed position of the oil passage to the exhaust camshaft by the signal from the PCM.
-
The construction is designed to supply a small amount of oil to the advance oil passage even while the middle point is maintained, improving holding stability while at low oil pressure.
Fail-safe
|
DTC |
Fail-safe |
|
P0014:00 |
|
|
P0015:00 |
|
|
P2090:00 |
|
|
P2091:00 |
|
 Oil Control Valve (OCV) Removal/Installation [Skyactiv G 2.0]
WARNING:
A hot engine can cause severe burns. Turn off the engine and wait until it
is cool before servicing.
1. Disconnect the negative battery cable..
2. Remove the plug hole plat ...
 Power Steering Malfunction Indicator Light
Purpose
The power steering malfunction indicator light warns the driver that there
is a malfunction with the electric power steering (EPS) system.
Function
If there is a malfunc ...
Other materials:
General Procedures (Suspension)
Wheel and Tire Installation
1. When installing the wheels and tires, tighten the wheel nuts in a criss-cross
pattern to the following tightening torque.
Tightening torque
108—147 N·m {12—14 kgf·m, 80—108 ft·lbf}
Suspension Links Removal/Installation
1. For the ...
Money-Saving Suggestions
How you operate your Mazda determines how far it will travel on a tank of fuel.
Use these suggestions to help save money on fuel and repairs.
• Avoid long warm-ups. Once the engine
runs smoothly, begin driving.
• Avoid fast starts.
• Keep the engine tuned. Follow the maintenance
sched ...
M Position Switch [Fw6 A EL, Fw6 Ax EL]
Purpose/Function
The M position switch detects that the selector lever is in the M position.
The M position switch signal is sent to the TCM via CAN, and is used for
manual shift control and engine-transaxle integration control.
Construction
The M position switch is in ...
