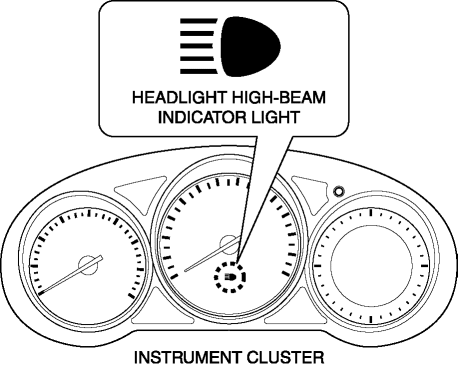
Mazda CX-5 Service & Repair Manual: Headlight High Beam Indicator Light
Purpose
-
Notifies the user that the headlights (HI) are illuminated.
Function
-
Illuminates when the headlight (HI) or parking illumination conditions are met.
Construction
-
Displayed in the instrument cluster.
Operation
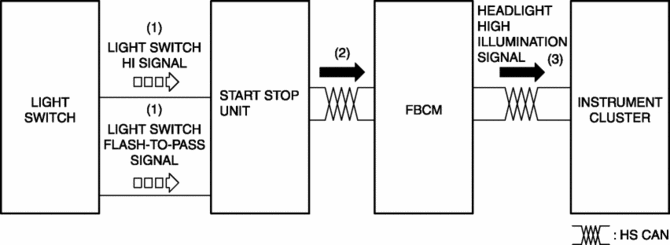
1. When the light switch is operated to the HI or parking position, a light switch HI or parking signal is input to the start stop unit.
2. The start stop unit sends the light switch HI or parking signal to the front body control module (FBCM).
3. The front body control module (FBCM) sends the light switch HI signal to the instrument cluster as a headlight HI illumination signal.
4. When the instrument cluster receives the headlight HI illumination signal, it illuminates the headlight high-beam indicator light.
Fail-safe
-
Function not equipped.
 Headlight Bulb Removal/Installation
Halogen Type
Headlight LO bulb
1. Disconnect the negative battery cable..
2. Disconnect the connector.
3. Rotate the headlight LO bulb in the direction of the arrow (1) shown in the
figure ...
 Headlight Leveling Actuator
Purpose, Function
The headlight leveling actuator drives the motor based on the target optical
axis voltage, which is input from the AFS control module, to change the optical
axis of the ...
Other materials:
Torque Converter Clutch (TCC) Control Solenoid [Fw6 A EL, Fw6 Ax EL]
Purpose/Function
The torque converter clutch (TCC) control solenoid adjusts the hydraulic
pressure in the TCC control circuit based on the current demand from the TCM
according to the vehicle conditions.
Construction
The TCC control solenoid is installed to the solenoid con ...
Power Seat System
Outline
The power seat system drives the electric motor, operates the front seat
safely, and changes the driving posture to suit the occupant by operating the
power seat switch.
8 way power seats or 6 way power seats have been adopted on the driver's
seat.
Function
...
Rear Trailing Link Removal/Installation
1. Remove the floor under cover..
2. Disconnect the rear parking cable..
3. Remove in the order indicated in the table.
4. Install in the reverse order of removal.
5. Inspect the wheel alignment and adjust it if necessary..
1
Rear trailing link installatio ...
