Mazda CX-5 Service & Repair Manual: Headlight Auto Leveling System
Outline
-
Automatically adjusts the headlight optical axis in response to changes in load and passenger conditions to prevent blinding of oncoming vehicles from headlight glare and to assure a range of visibility.
-
The AFS control module performs headlight auto leveling system fail-safe..
Function
-
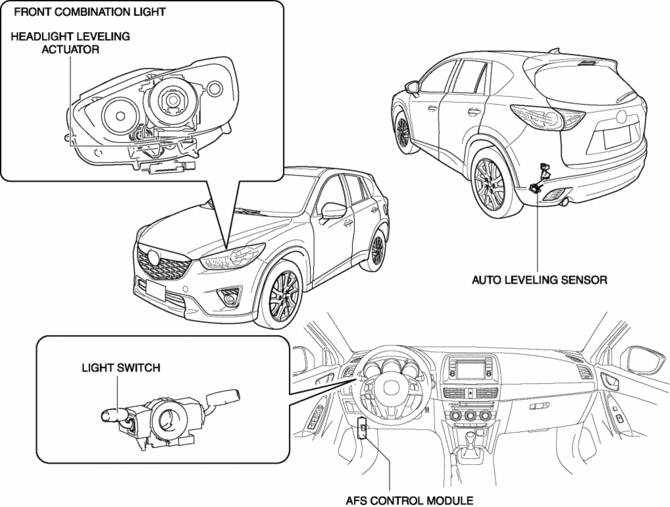
The headlight auto leveling system is controlled by the AFS control module.
-
The AFS control module also controls the AFS which changes the optical axis to the direction in which the vehicle is travelling according to the steering wheel operation and vehicle speed while the headlights are turned on..
Optical axis adjustment function
-
If the ignition is switched ON (engine on or off) and there is a vehicle height change when the headlights (LO) are illuminated, the AFS control module automatically adjusts the headlight optical axis.
-
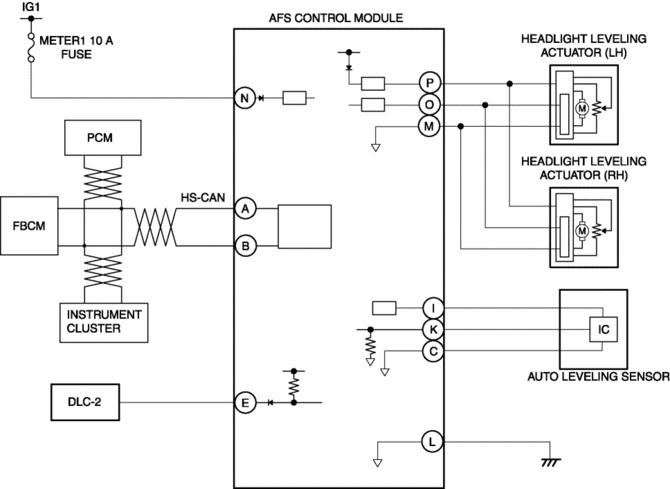
The AFS control module controls the optical axis adjustment function based on the following CAN signals.
|
CAN signal sending module |
Signal name |
|
PCM |
Vehicle speed signal |
|
Instrument cluster |
Ignition switch status signal |
|
Front body control module (FBCM) |
Headlight illumination status signal |
Structural view
System wiring diagram
Operation
Optical axis adjustment if vehicle height changes while vehicle is stopped
-
Operation condition
-
Operates when all of the following conditions are met:
-
Vehicle speed is 0 km/h {0 mph}
-
Ignition switch ON (engine off or on)
-
Headlight LO illumination (headlight LO illumination signal reception)
-
Detects change in vehicle height amount * at specified value or more
-
Operation
-
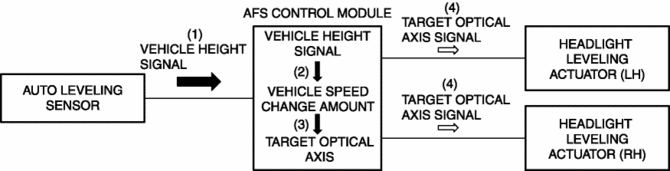
When the ignition is switched ON (engine off or on), the auto leveling sensor inputs a vehicle height signal to the AFS control module.
-
When the headlights (LO) turn on, the AFS control module calculates the amount of change in the vehicle height * based on the vehicle height signal.
-
When the amount of change in the vehicle height * is the specified value or more, the AFS control module calculates the target optical axis based on the calculated amount of change in the vehicle height *.
-
The AFS control module outputs the calculated target optical axis signal to the headlight leveling actuator.
-
The headlight leveling actuator drives the motor when the target optical axis signal is input.
Optical axis adjustment if vehicle height changes while vehicle is moving
-
Operation condition
-
Operates when all of the following conditions are met:
-
Headlight LO illumination (headlight LO illumination signal reception)
-
Vehicle speed 30 km/h {19 mph} or more
-
Detects change in vehicle speed of 3 km/h {2 mph} or less for continuous period of 25 s
-
Detects change in vehicle height amount * at specified value or more
-
Operation
-
While the vehicle is travelling, the auto leveling sensor inputs the vehicle height signal to the AFS control module.
-
When the headlights (LO) turn on, the AFS control module calculates the amount of change in the vehicle height * based on the vehicle height signal.
-
When the vehicle speed is 30 km/h {19 mph} or more, the detected change in vehicle speed is 3 km/h {2 mph} or less for a continuous 25 s, and the change in the amount of vehicle height * is the specified value or more, the AFS control module calculates the target optical axis based on the calculated change in the amount of vehicle height *.
-
The AFS control module outputs the calculated target optical axis signal to the headlight leveling actuator.
-
The headlight leveling actuator drives the motor when the target optical axis signal is input.
* The change in the amount of vehicle height is the calculated 1 s average value of the vehicle height signal which the AFS control module detects every 0.1 s.
 Headlight Aiming
NOTE:
Perform headlight aiming if any of the following work is performed.
Front combination light replacement
Work that can affect vehicle height such as suspension rep ...
 Headlight Auto Leveling System Initialization
NOTE:
The AFS control module records the vehicle height while it is unoccupied
by performing the headlight auto leveling system initial setting.
Perform headlight auto leveling syst ...
Other materials:
Rear Brake (Disc)
Purpose/Function
Large diameter, solid-disc type front brakes with a 303 mm {11.9 in} diameter
and 10 mm {0.39 in} thickness have been adopted, improving braking force and
fade resistance.
Construction
Operation
When brake fluid is applied, the piston equipped on one s ...
Shift Point Control (Manual Shift Control) [Fw6 A EL, Fw6 Ax EL]
Outline
The TCM operates the manual shift control when the M position is selected.
If the M position is selected, manual shifting is prioritized according to
the driver’s shift up/shift down operation. However, to assure driving safety
and protect the ATX, minimum automatic sh ...
Cooling System Cap
Purpose, Function
The cooling system cap maintains appropriate pressure in the engine coolant
passage. In addition, cooling efficiency has been improved by increasing the
engine coolant boiling point.
Construction
The cooling system cap is installed to the upper part of the ...
