Mazda CX-5 Service & Repair Manual: Fuel Gauge Sender Unit Removal/Installation [Awd]
WARNING:
-
Always keep sparks and flames away from fuel when servicing the fuel system. Fuel can be easily ignited which could cause serious injury or death, and damage to equipment.
-
Fuel line spills and leakage from the pressurized fuel system are dangerous. Fuel can ignite and cause serious injury or death and damage. Fuel can also irritate skin and eyes. To prevent this, always complete the Fuel Line Safety Procedure, while referring to the BEFORE SERVICE PRECAUTION.
-
A person charged with static electricity could cause a fire or explosion, resulting in death or serious injury. Before draining fuel, make sure to discharge static electricity by touching a vehicle.
CAUTION:
-
If the fuel gauge level indicates 3/4 or more, the fuel surface is higher than the fuel pump unit and fuel gauge sender unit installation surface. If servicing is performed under this condition, fuel leakage could result. Always drain the fuel before performing the operation and keep the fuel in the fuel tank at less than half.
Fuel Gauge Sender Unit (main)
NOTE:
-
For the fuel gauge sender unit removal/installation, refer to the fuel pump removal/installation because the fuel gauge sender unit is integrated with the fuel pump..
Fuel Gauge Sender Unit (sub)
1. Perform the "Fuel Line Safety Procedure" referring to the "BEFORE REPAIR PROCEDURE"..
2. If the fuel gauge level indicates 3/4 or more, refer to the "FUEL DRAINING PROCEDURE" and drain the fuel..
3. Remove the following parts:
a. Rear seat cushion (6:4 split type).
b. Rear seat under installation bolt (4:2:4 split type).
c. Rear scuff plate.
4. Partially peel back the floor covering.
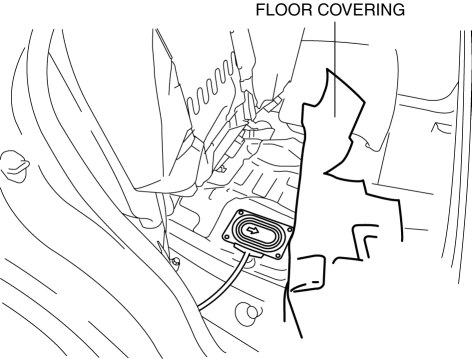
5. Remove the screws.
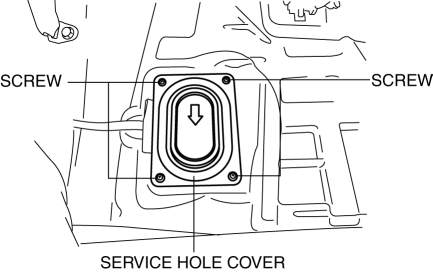
6. Remove the service hole cover.
7. Disconnect the connector.
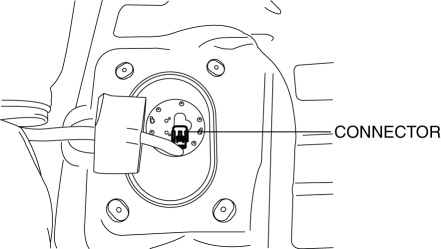
8. Remove the screws.
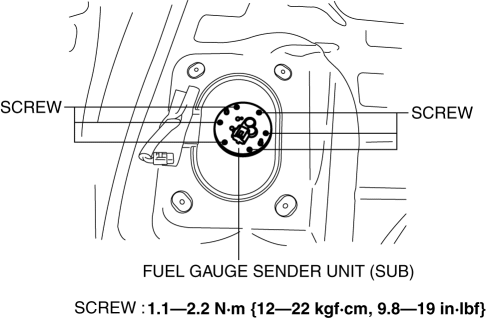
9. Remove the fuel gauge sender unit (sub).
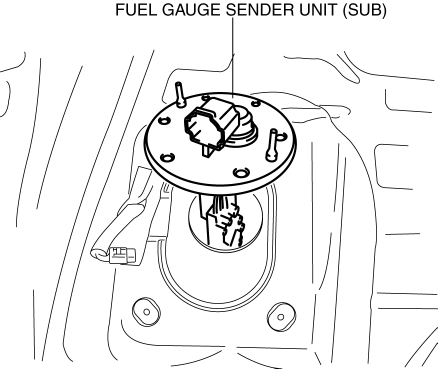
10. Install in the reverse order of removal.
11. Perform the fuel leakage inspection referring to [AFTER SERVICE PRECAUTION]..
 Fuel Gauge Sender Unit Removal/Installation [2 Wd]
WARNING:
Always keep sparks and flames away from fuel when servicing the fuel system.
Fuel can be easily ignited which could cause serious injury or death, and damage
to equipment.
...
 Low Engine Coolant Temperature Indicator Light (Blue)/High Engine Coolant Temperature
Warning Light (Red)
Purpose
Low engine coolant temperature indicator light (blue)
The low engine coolant temperature indicator light (blue) notifies the driver
that the engine coolant temperature is low and va ...
Other materials:
Keyless Antenna Removal/Installation
With Advanced Keyless Entry System
Vehicle interior, front
1. Disconnect the negative battery cable..
2. Remove the following parts:
a. Decoration panel.
b. Shift lever knob (MTX).
c. Front console box.
d. Shift panel.
e. Upper panel.
f. Rear console.
g. Side wall.
h. Front conso ...
Automatic Transaxle Fluid (ATF) Replacement [Fw6 A EL, Fw6 Ax EL]
WARNING:
Do not perform the servicing while the ATF is hot. Otherwise, it could cause
severe burns or serious injury.
1. Remove the front under cover No.2..
2. Remove the dipstick securing bolt.
3. Remove the dipstick.
4. Remove the drain plug and washer, and drain the ATF ...
Rear Seat Back Frame Removal/Installation
CAUTION:
When performing the procedure with a rear seat removed from the vehicle,
perform the procedure on a clean cloth so as not to damage or soil the seat.
6:4 Split Type
1. Remove the trunk board..
2. Remove the rear seat back..
3. Remove the headrest.
4. Open fasteners A ...
