Mazda CX-5 Service & Repair Manual: Automatic Transaxle Fluid (ATF) Replacement [Fw6 A EL, Fw6 Ax EL]
WARNING:
-
Do not perform the servicing while the ATF is hot. Otherwise, it could cause severe burns or serious injury.
1. Remove the front under cover No.2..
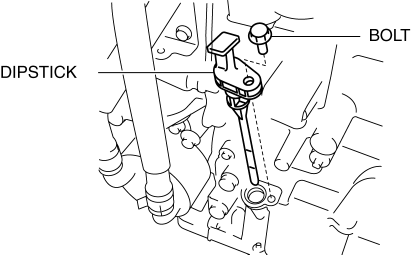
2. Remove the dipstick securing bolt.
3. Remove the dipstick.
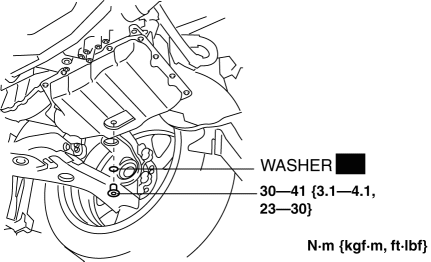
4. Remove the drain plug and washer, and drain the ATF.
5. Install a new washer and drain plug.
-
Tightening torque
-
30—41 N·m {3.1—4.1 kgf·m, 23—30 ft·lbf}
6. Add ATF from the dipstick installation hole.
NOTE:
-
The ATF color is blue.
-
Only use ATF FZ for the FW6A-EL, FW6AX-EL.
-
ATF type
-
ATF FZ
-
Resupply amount (Reference)
-
ATF is drained from drain plug: 3.5—4.9 L {3.7—5.1 US qt, 3.1—4.3 Imp qt}
7. Adjust the ATF level..
8. Insert the dipstick and install the securing bolt.
-
Tightening torque
-
8—11 N·m {82—112 kgf·cm, 71—97 in·lbf}
9. Install the front under cover No.2..
 Automatic Transaxle Fluid (ATF) Inspection [Fw6 A EL, Fw6 Ax EL]
CAUTION:
If the ATF level is not within the specification or ATF is not adhering to
the dipstick after warming up the engine, do not drive the vehicle. Otherwise,
the transaxle could be ...
 Automatic Transaxle Outline [Fw6 A EL, Fw6 Ax EL]
Outline
Contribution to low fuel economy
Wide TCC range
Clutch/brake resistance reduction
Realized direct feel and quick shif ...
Other materials:
Towing
Towing Description
Proper lifting and towing are necessary to prevent damage to the vehicle.
Government and local laws must be followed.
A towed vehicle usually should have its drive wheels (front wheels) off the
ground. If excessive damage or other conditions prevent this, use ...
Vacuum Pump Inspection
1. Pinch open the clamp using pliers and disconnect the vacuum hose from the
vacuum pump..
2. Install the vacuum gauge as shown in the figure, then check the vacuum.
3. Warn up the engine.
If the pressure is less than the specification, inspect for the following.
Malf ...
Resistor [Manual Air Conditioner]
Purpose
The resistor controls the blower motor rotation speed.
Function
The resistor controls the supply voltage to the blower motor according to
the fan switch operation, and adjusts the fan rotation speed (airflow volume).
Construction
The resistor is installed ...
