Mazda CX-5 Service & Repair Manual: Front Door Latch Switch Inspection
1. Perform the front door glass preparation..
2. Disconnect the negative battery cable..
3. Remove the following parts:
a. Inner garnish.
b. Front door trim.
c. Front door glass.
d. Front door module panel.
e. Front door key cylinder.
f. Front door latch and lock actuator.
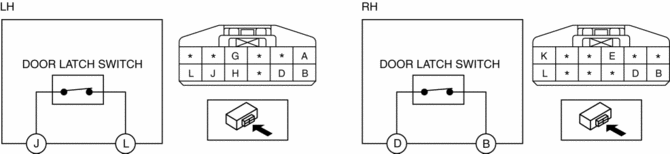
4. Verify that the continuity is as indicated in the table.

-
If not as indicated in the table, replace the front door latch and lock actuator.
NOTE:
-
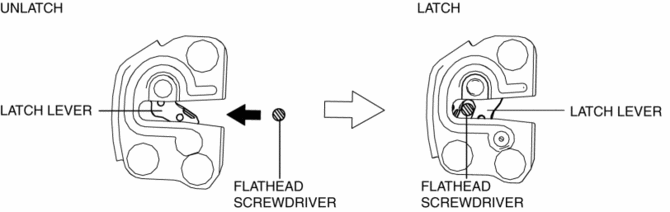
When inspecting the latch side of the front door latch switch, press in the latch lever using a flathead screwdriver and set it to the latched position.
 Front Door Latch Switch
Purpose, Function
Switches on/off in conjunction with the latch lever rotation, and detects
the front door open/closed condition by the voltage which is changed by the
rear body control m ...
 Front Door Module Panel Removal/Installation
1. Perform the front door glass preparation..
2. Disconnect the negative battery cable..
3. Remove the following parts:
a. Inner garnish.
b. Front door trim.
c. Front door speaker.
d. Fron ...
Other materials:
Outer Mirror Glass Installation
1. Connect the mirror heater connectors. (with heated outer mirror)
2. Connect the blind spot monitoring (BSM) warning indicator light connector
(with blind spot monitoring system).
NOTE:
Lightly pull the blind spot monitoring (BSM) warning indicator light connector
and verify t ...
Variable Valve Timing Mechanism
Outline
Achieves optimum valve timing according to the driving conditions by the
variable valve timing mechanism changing the phases of the camshaft.
An electric type variable valve timing mechanism on the intake side and a
hydraulic pressure type on the exhaust side has been ad ...
Shift Position Indicator Light [Fw6 A EL, Fw6 Ax EL]
Purpose/Function
The shift position indicator light indicates the selector lever position.
Construction
The shift position indicator light is built into the instrument cluster.
Operation
The TCM sends a shift position indicator light illumination request signal ...
