Mazda CX-5 Service & Repair Manual: Front Bumper Disassembly/Assembly
1. Disassemble in the order indicated in the table.
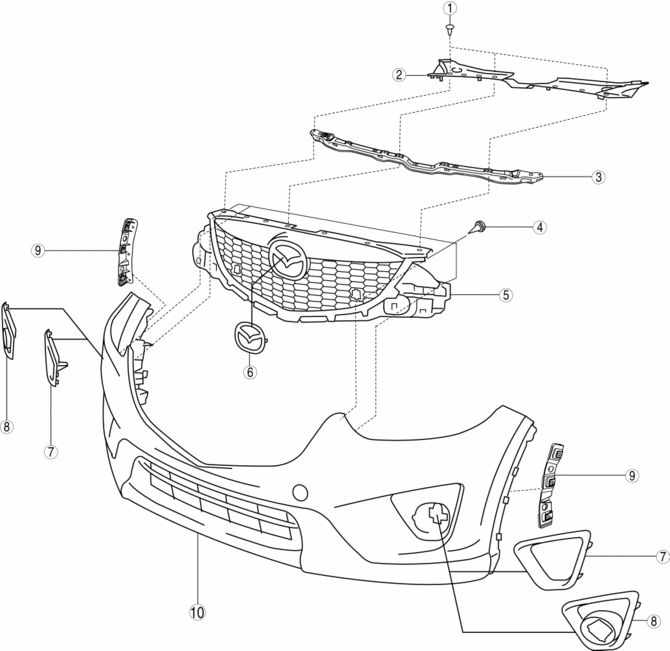
|
1 |
Rivet |
|
2 |
Grille bracket |
|
3 |
Front bumper retainer |
|
4 |
Screw |
|
5 |
Radiator grille |
|
6 |
Ornament |
|
7 |
Front fog light hole cover (without front fog lights) |
|
8 |
Front fog light hole cover (with front fog lights) |
|
9 |
Bracket |
|
10 |
Front bumper |
2. Assemble in the reverse order of disassembly.
 Front Beltline Molding Removal/Installation
CAUTION:
Affix protective tape to the position shown in the figure.
1. Fully open the front door glass.
2. Insert a tape-wrapped flathead screwdriver and then detach clips A in the ...
 Front Bumper Reinforcement Removal/Installation
1. Disconnect the negative battery cable..
2. Remove the following parts:
a. Seal board upper.
b. Front bumper.
c. Front combination light.
d. Set plate.
e. Energy-absorbing form.
f. Fro ...
Other materials:
Engine Coolant Temperature (ECT) Sensor Removal/Installation
WARNING:
When the engine is hot, it can badly burn. Turn off the engine and wait until
it is cool before removing the ECT sensor.
ECT Sensor No.1
1. Disconnect the negative battery cable..
2. Remove the plug hole plate..
3. Drain the engine coolant..
4. Pull out the evaporati ...
Active Command Modes Inspection [Instrument Cluster]
1. Connect the M-MDS to the DLC-2.
2. After the vehicle is identified, select the following items from the initialization
screen of the M-MDS.
a. Select “DataLogger”.
b. Select “Modules”.
c. Select “IC”.
3. Select the simulation items from the PID table.
4. Perform the acti ...
Uniform Tire Quality Grading System (UTQGS)
Uniform Tire Quality Grading System (UTQGS)
This information relates to the tire grading system developed by the U.S. National
Highway Traffic Safety Administration for grading tires by tread wear, traction,
and temperature performance.
Tread Wear
The tread wear grade is a comparative rating ...
