Mazda CX-5 Service & Repair Manual: Forced Ignition On
NOTE:
-
In order to perform a forced ignition ON, the M-MDS is necessary. If the servicing is being done outside of an Authorized Mazda dealership, contact an Authorized Mazda dealership for instructions.
-
The forced ignition ON procedure forces a power supply to each part when no power is available even after the ignition switch has been operated. However, the engine cannot be started and the steering cannot be unlocked.
-
When performing a forced ignition ON procedure, remove all remote transmitters from the vehicle. If an remote transmitter is left in the vehicle, the forced ignition ON procedure cannot be done.
1. Verify that there are no remote transmitters in the vehicle.
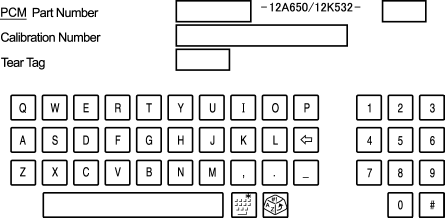
2. Get PCM part number from As-built site.
3. Connect the M-MDS to the DLC-2.
4. Manual vehicle identification.
-
Select “Manual Vehicle Entry”.
5. Select the “All other” from Vehicle list.
6. Input the PCM part number on the following screen.
7. After the vehicle is identified, select the following items from the initialization screen of the M-MDS.
-
Select “Body”.
-
Select “Special Ignition ON”.
8. Perform the procedure according to the directions on the screen.
9. Delete the session, but keep the ignition ON.
10. Normal vehicle identification.
 Electronic Spark Advance Control [Skyactiv G 2.0]
Outline
Controls ignition to optimum timing according to engine operation conditions.
Serviceability has been improved by eliminating the necessity of ignition
timing adjustment.
...
 Fuel Distributor [Skyactiv G 2.0]
Purpose, Function
Distributes fuel pumped from the high pressure fuel pump to each fuel injector.
Construction
The fuel distributor is installed to the cylinder head.
...
Other materials:
Seat Belt Warning Alarm
Purpose
The seat belt warning alarm warns occupants that a seat belt is not fastened.
Function
The instrument cluster sounds the seat belt warning alarm based on the following
CAN signals:
Vehicle speed signal sent from PCM
Driver/passenger buckle switc ...
St 001/12 Special Service Tool Shipment January 2013
APPLICABLE MODEL(S)/VINS
2014 Mazda6
2014 CX-5
DESCRIPTION/PRICING
In support of the new 2014 Mazda6 and the 2014 CX-5, Mazda will ship to all dealers
one (1) new Special Service Tool (SST). The SST will be shipped automatically by
Mazda’s tool vendor, SPX during January 2013.
The followi ...
Exhaust Manifold
Purpose, Function
By lengthening the exhaust passage, the transmission of exhaust pressure
waves to other cylinders can be delayed, and the amount of gas exhausted from
a cylinder and forced back inside the combustion chamber is reduced By reducing
the residual gas, the temperature i ...
