Mazda CX-5 Service & Repair Manual: Floor Covering Removal/Installation
1. Disconnect the negative battery cable..
2. Remove the following parts:
a. Front scuff plate.
b. Front side trim.
c. Rear scuff plate.
d. B-pillar lower trim.
e. Rear seat cushion.
f. Front seat.
g. Lower anchor of the front seat belt (without lap pre-tensioner seat belt).
h. Lap pre-tensioner seat belt (with lap pre-tensioner seat belt).
i. Shift lever knob (MTX).
j. Front console box.
k. Shift panel.
l. Upper panel.
m. Rear console.
n. Side wall.
o. Front console.
p. SAS control module.
q. Parking brake lever.
r. Joint cover.
3. Remove fasteners.
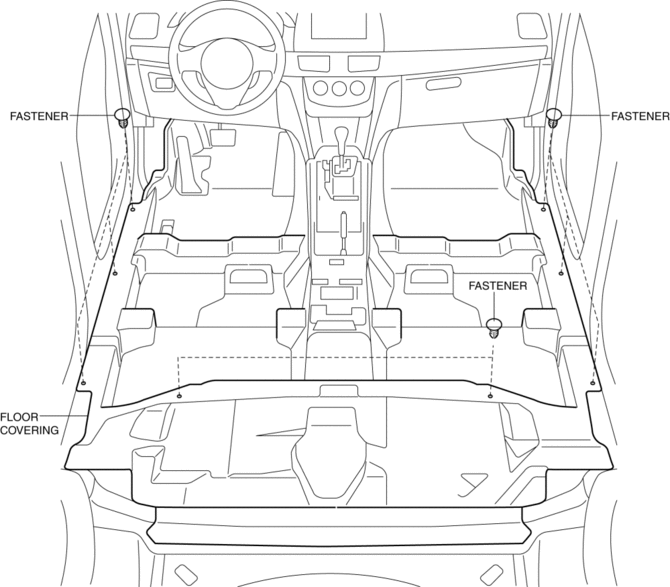
4. Take the floor covering out from the opened door.
5. Install in the reverse order of removal.
 Decoration Panel Removal/Installation
CAUTION:
Affix protective tape to the position shown in the figure.
1. Disconnect the negative battery cable..
2. Open the glove compartment.
3. Insert a tape-wrapped flathead ...
 Floor Insulator Removal/Installation
Driver-side
1. Disconnect the negative battery cable..
2. Remove the following parts:
a. Driver-side front scuff plate.
b. Driver-side front side trim.
c. Decoration panel.
d. Shift lever k ...
Other materials:
Front Seat Back Trim Removal/Installation
WARNING:
Handling a side air bag improperly can accidentally operate (deploy) the
air bag, which may seriously injure you. Read the service warnings/cautions
in the Workshop Manual before handling the front seat (side air bag integrated)..
If the sliding mechanisms on both ...
Intake Air System
Purpose, Outline
A vacuum pump has been adopted which supplies stable vacuum to the power
brake unit.
Structural View
System Diagram
Vacuum Hose Routing Diagram
Structure
The intake air system consists of the following parts:
Part na ...
Oil Cooler Removal/Installation
WARNING:
Hot engines and engine oil can cause severe burns. Turn off the engine and
wait until it and the engine oil have cooled.
A vehicle that is lifted but not securely supported on safety stands is dangerous.
It can slip or fall, causing death or serious injury. Never work ...
