Mazda CX-5 Service & Repair Manual: Oil Cooler Removal/Installation
WARNING:
-
Hot engines and engine oil can cause severe burns. Turn off the engine and wait until it and the engine oil have cooled.
-
A vehicle that is lifted but not securely supported on safety stands is dangerous. It can slip or fall, causing death or serious injury. Never work around or under a lifted vehicle if it is not securely supported on safety stands.
-
Continuous exposure to USED engine oil has caused skin cancer in laboratory mice. Protect your skin by washing with soap and water immediately after working with engine oil.
1. Disconnect the negative battery cable..
2. Remove the front under cover No.2..
3. Drain the engine coolant..
4. Remove in the order indicated in the table.
5. Use a clean rag to wipe off the mounting surface on the oil filter body and the oil cooler.
6. Install in the reverse order of the removal.
7. Refill the engine coolant..
8. Start the engine and confirm that there is no oil leakage.
-
If there is oil leakage, repair or replace the applicable part.
9. Inspect the oil level..
10. Inspect for engine coolant leakage..
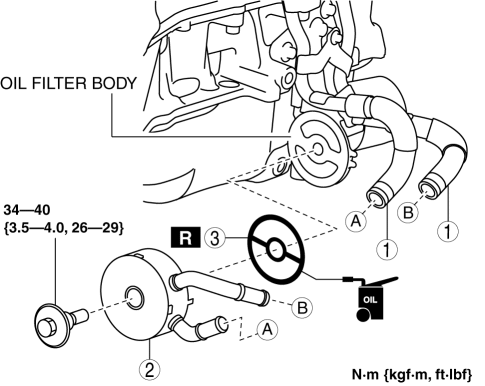
|
1 |
Water hose |
|
2 |
Oil cooler (See Oil Cooler Installation Note.) |
|
3 |
Gasket (See Gasket Installation Note.) |
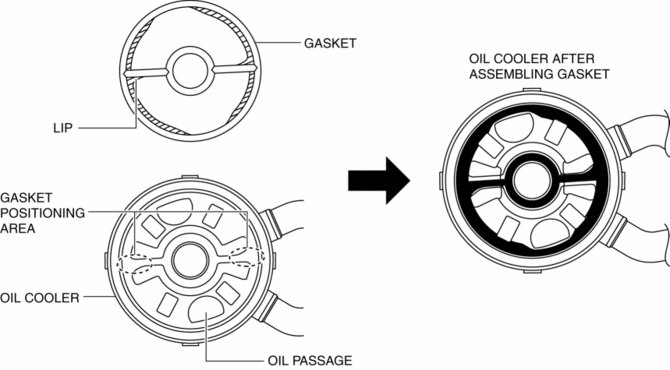
Gasket Installation Note
1. Apply engine oil to a new gasket.
CAUTION:
-
Assemble the gasket to the correct position using the following procedure so that the gasket lip does not overlap the oil passage for the oil cooler. Otherwise, it could leak engine oil and damage the engine.
2. Align the gasket lip to the gasket positioning areas of the oil cooler and assemble the gasket to the oil cooler.
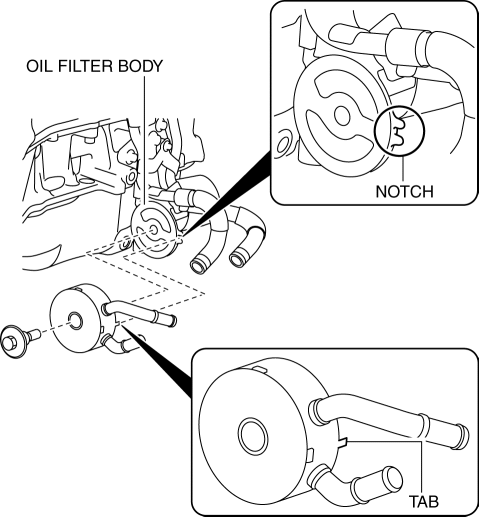
Oil Cooler Installation Note
1. Install the oil cooler with the tab aligned with the notch of the oil filter body.
 Oil Cooler Removal/Installation [Fw6 A EL, Fw6 Ax EL]
1. Disconnect the negative battery cable..
2. Remove the front under cover No.2..
3. Drain the ATF..
4. Drain the engine coolant..
5. Remove in the order indicated in the table.
...
 Oil Cooler [Fw6 A EL, Fw6 Ax EL]
Purpose/Function
The oil cooler constantly maintains maximum ATF performance in the transaxle
by maintaining an optimum ATF temperature which has the effect of achieving
reduced fuel cons ...
Other materials:
Filament Repair
1. Clean the filament using isopropyl alcohol.
2. Attach tape to both sides of the filament.
3. Using a small brush or marking pen, apply silver paint.
4. After 2—3 min, carefully remove the tape without damaging the applied
area.
CAUTION:
Do not operate the rear window defro ...
Liftgate Opener System
Outline
A liftgate opener system has been adopted in which the liftgate can be opened
just by pressing the liftgate opener switch.
The rear body control module (RBCM) performs liftgate opener system fail-safe..
Function
When the liftgate opener switch is pressed, the l ...
Air Bag System Warning Light [Standard Deployment Control System]
Purpose
The air bag system warning light notifies the driver of a malfunction in
the SRS air bag system.
Function
If a malfunction occurs in the SRS air bag system, the air bag system warning
light illuminates or flashes.
Construction
LEDs (light-emitting d ...
