Mazda CX-5 Service & Repair Manual: Clock Spring Removal/Installation [Standard Deployment Control System]
CAUTION:
-
If the disc on the combination switch is deformed or has foreign material adhering to it, performance of the steering angle sensor may be reduced, causing abnormal operation. When handling the clock spring, be careful not to deform the disc and make sure there is no foreign material on it.
1. Switch the ignition to off.
2. Disconnect the negative battery cable and wait for 1 min or more
..
3. Remove the driver?side air bag module..
4. Remove the steering wheel..
5. Remove the column cover..
6. Disconnect the clock spring connector.
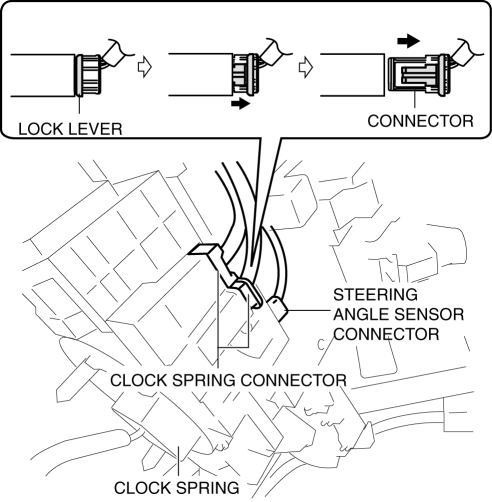
7. Disconnect the steering angle sensor connector. (with steering angle sensor)
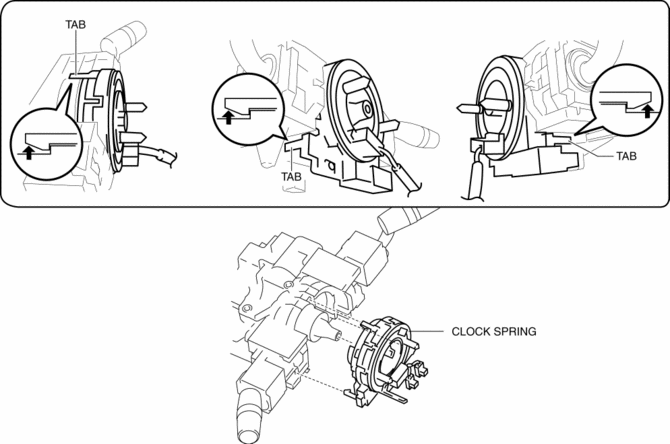
8. Remove the tab direction of the arrow shown in the figure and remove the clock spring.
9. Install in the reverse order of removal..
10. Verify that the air bag system warning light illuminates for approx. 6 s
and goes out.
-
If the air bag system warning light does not operate in the manner described above, there are malfunctions in the system. Inspect the system using the on-board diagnostic..
Clock Spring Installation Note
CAUTION:
-
If the clock spring is not adjusted, the spring wire in the clock spring will break due to overtension when the steering wheel is turned. Always adjust the clock spring after installing it.
-
Adjust the clock spring after installing it..
 Clock Spring Inspection [Two Step Deployment Control System]
1. Disconnect the negative battery cable and wait for 1 min or more..
2. Remove the driver?side air bag module..
3. Remove the steering wheel..
4. Remove the column cover..
5. Remove the cloc ...
 Clock Spring Removal/Installation [Two Step Deployment Control System]
CAUTION:
If the disc on the combination switch is deformed or has foreign material
adhering to it, performance of the steering angle sensor may be reduced, causing
abnormal operation. Wh ...
Other materials:
Bumper Bracket Removal [Panel Replacement]
Symbol Mark
Removal Procedure
1. Rough cut area locations indicated by (A).
2. Grind the 6 locations indicated by (B) shown in the figure.
CAUTION:
When grinding 6 locations indicated by (B) shown in the figure and the front
side frame is damaged, there is a possibility that ...
Side Air Bag Sensor Removal/Installation [Two Step Deployment Control System]
WARNING:
Handling the side air bag sensor improperly can accidentally operate (deploy)
the air bag module, which may seriously injure you. Read the air bag system
service warnings and cautions before handling the side air bag sensor..
1. Switch the ignition to off.
2. Disconnec ...
Oil Pressure Switch Removal/Installation [Fw6 A EL, Fw6 Ax EL]
WARNING:
A hot transaxle and ATF can cause severe burns. Turn off the engine and wait
until they are cool.
Always wear protective eye wear when using the air compressor. If the air
compressor is used, any particles of dirt or soiling could spatter and get into
the eyes.
...
