Mazda CX-5 Service & Repair Manual: Bumper Slider Removal/Installation
Front Bumper Slider
1. Disconnect the negative battery cable..
2. Remove the seal board upper..
3. Remove the front bumper..
4. Remove bolts A.
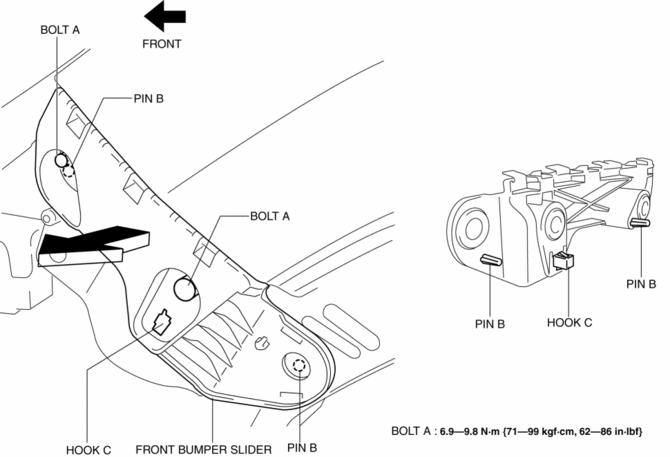
5. Pull the front bumper slider in the direction of the arrow while detaching pins B and hook C.
6. Install in the reverse order of removal.
Rear Bumper Slider
1. Disconnect the negative battery cable..
2. Remove the following parts:
a. Rear combination light.
b. Rear splash shield.
c. Rear bumper.
3. Remove screw A.
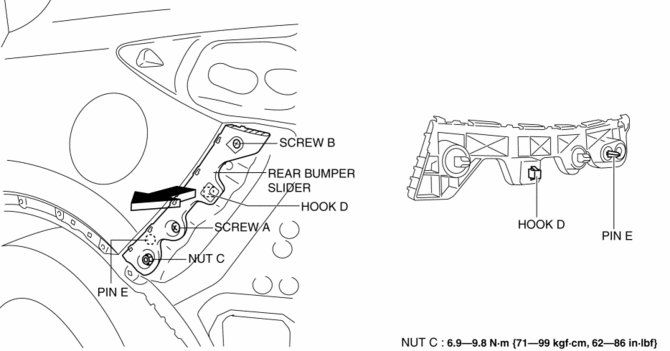
4. Remove screw B.
5. Remove nut C.
6. Pull the rear bumper slider in the direction of the arrow while detaching hook D and pin E.
7. Install in the reverse order of removal.
 Bumper Bracket Removal [Panel Replacement]
Symbol Mark
Removal Procedure
1. Rough cut area locations indicated by (A).
2. Grind the 6 locations indicated by (B) shown in the figure.
CAUTION:
When grinding 6 locations indi ...
 Bumper Stiffener Lower Removal/Installation
1. Disconnect the negative battery cable..
2. Remove the following parts:
a. Seal board upper.
b. Front bumper.
c. Seal plate.
d. Front under cover No.1.
3. Remove bolts A.
4. Pull t ...
Other materials:
Mechanical
Outline
The sliding resistance*1 has been reduced by:
the adoption of a rocker arm (built into needle roller bearing)
reducing load on the valve spring
narrowing down the crankshaft journal
optimizing the piston skirt shape
adoption of ...
Shroud Upper Reinforcement Removal [Panel Replacement]
Symbol Mark
Removal Procedure
1. Drill the 4 locations shown in the figure.
NOTE:
When drilling the 4 locations shown in the figure, do not drill a hole all
the way through or there could be a problem when installing the new part.
2. Remove the shroud upper reinforcement ...
Pressure Sensor [Two Step Deployment Control System]
Purpose
The pressure sensor determines at an earlier stage whether to detonate the
air bag on the side of the vehicle (around front door) receiving an impact.
This is for improved accuracy of the side air bag operation (deployment).
Function
When the vehicle is involved in ...
