Mazda CX-5 Service & Repair Manual: Automatic Transaxle Fluid (ATF) Inspection [Fw6 A EL, Fw6 Ax EL]
CAUTION:
-
If the ATF level is not within the specification or ATF is not adhering to the dipstick after warming up the engine, do not drive the vehicle. Otherwise, the transaxle could be damaged.
ATF level inspection
1. Remove the dipstick securing bolt.
2. Connect the M-MDS to the DLC-2 and display the PID TFT.
3. Warm up the engine until the ATF temperature is 50 °C {122 °F}
.
4. Remove the dipstick and wipe ATF off using a nylon cloth while leaving the engine idling.
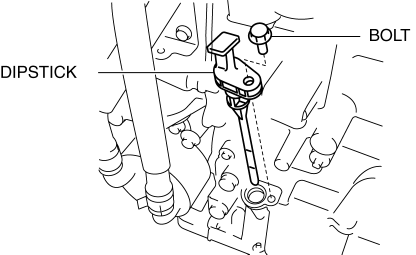
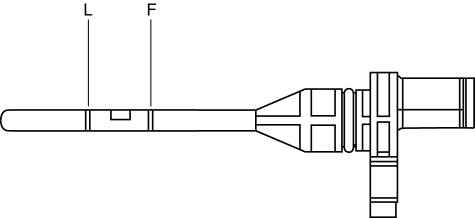
5. Insert the dipstick and pull it out again.
6. Verify that the ATF is adhering between L and F on the dipstick.
-
If ATF is not adhering between L and F on the dipstick, adjust the ATF level..
NOTE:
-
The ATF color is blue.
-
Only use ATF FZ for the FW6A-EL, FW6AX-EL.
-
ATF type
-
ATF FZ
7. Insert the dipstick and install the securing bolt.
-
Tightening torque
-
8—11 N·m {82—112 kgf·cm, 71—97 in·lbf}
 Automatic Transaxle Fluid (ATF) Adjustment [Fw6 A EL, Fw6 Ax EL]
CAUTION:
Only adjust the ATF level when the ATF temperature is 45—55 °C {113—131 °F}.
If the ATF level is incorrect, it could damage the transaxle.
Do not add ATF over the spe ...
 Automatic Transaxle Fluid (ATF) Replacement [Fw6 A EL, Fw6 Ax EL]
WARNING:
Do not perform the servicing while the ATF is hot. Otherwise, it could cause
severe burns or serious injury.
1. Remove the front under cover No.2..
2. Remove the dipstick s ...
Other materials:
Tie Rod Inspection
1. Inspect for bending and damage.
If there is any malfunction, replace the tie rod.
2. Inspect for excessive play.
If there is any malfunction, replace the tie rod.
3. Swing the tie rod five times.
4. Measure the swing torque of the tie rod using a pull scale.
...
Keyless Beeper
Purpose, Function
Notifies the user that the lock/unlock operation of the advanced keyless
entry system is completed, and warns if the system is operated incorrectly.
Construction, Operation
Installed inside the cowl grille.
The keyless beeper operates based on the LF ...
Steering Wheel
Steering Wheel
WARNING
Never adjust the steering wheel while the vehicle is moving: Adjusting the steering
wheel while the vehicle is moving is dangerous.
Moving it can very easily cause the driver to abruptly turn to the left or right.
This can lead to loss of control or an accident.
Steeri ...
