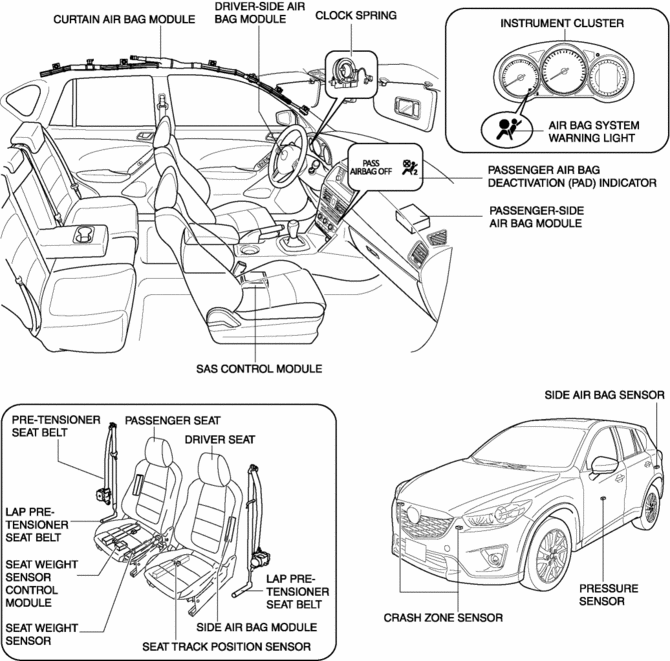
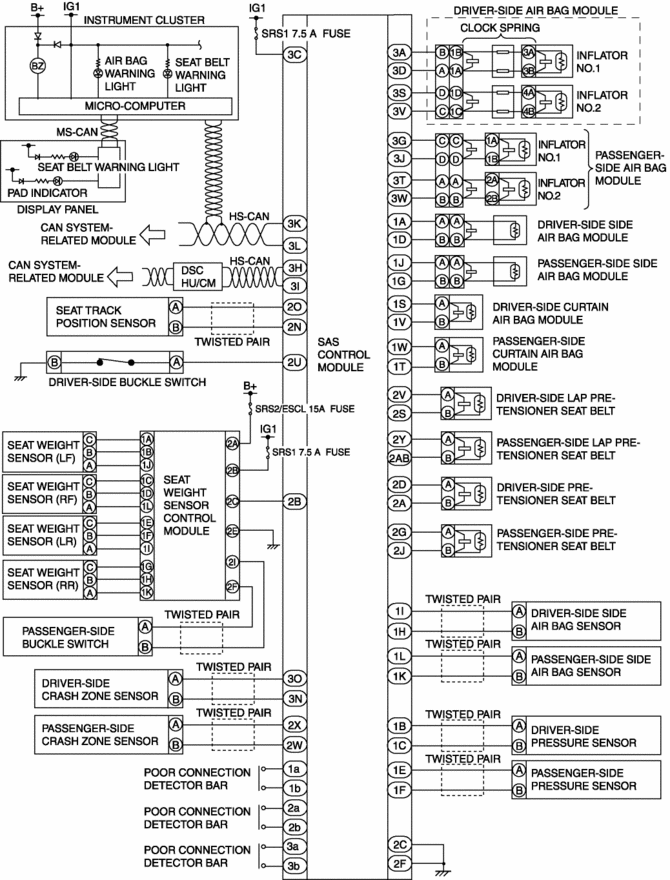
Mazda CX-5 Service & Repair Manual: Air Bag System [Two Step Deployment Control System]
Outline
-
The air bag system is a device that supplements the passenger restraint function of the seat belts. The air bag system will not have the designed effect if the seat belts are not worn properly.
-
The air bag system is composed of the following parts:
|
Item |
Outline |
|
SAS control module |
|
|
Crash zone sensor |
|
|
Side air bag sensor |
|
|
Pressure sensor |
|
|
Driver-side air bag module |
|
|
Passenger-side air bag module |
|
|
Side air bag module |
|
|
Curtain air bag module |
|
|
Pre-tensioner seat belt |
|
|
Lap pre-tensioner seat belt |
|
|
Air bag system warning light |
|
Structural View
Wiring Diagram
 Air Bag System [Standard Deployment Control System]
Outline
The air bag system is a device that supplements the passenger restraint function
of the seat belts. The air bag system will not have the designed effect if the
seat belts are not ...
 Barometric Pressure (Baro) Sensor Inspection
Voltage Inspection
NOTE:
Because the BARO sensor is integrated in the PCM, replacing the BARO sensor
includes replacement of the PCM.
1. Connect the M-MDS to the DLC?2.
2. Switch t ...
Other materials:
Keyless Antenna [Keyless Entry System]
Purpose
Outputs a request signal and specifies the remote transmitter location.
Function
The keyless antennas output request signals based on the signals from the
start stop unit.
Construction, Operation
Request signals are output by the keyless antenna installed ...
Resistor Inspection [Manual Air Conditioner]
1. Verify that the resistance between the resistor terminals is as shown in the
table.
If there is any malfunction, replace the resistor.
Terminal
Resistance (ohm)
A—D
0.35—0.41
A—B
0. ...
Dashboard Under Cover Removal/Installation
1. Detach hooks A in the direction of arrow (1) shown in the figure.
2. Pull the dashboard under cover in the direction of arrow (2) while detaching
pins B.
3. Remove the dashboard under cover in the direction of the arrow (3) shown in
the figure while detaching the guide C.
CAUTION:
...
