Mazda CX-5 Service & Repair Manual: Adjuster Anchor Removal/Installation
WARNING:
-
The side air bag sensor is attached to the lower part of the B-pillar. When working around the B-pillar, disconnect the negative battery cable or work carefully, avoiding excessive impact to the lower part of the B-pillar (with side air bag sensor No.1).
1. Switch the ignition off.
2. Disconnect the negative battery cable and wait for 1min or more
..
3. Set the adjuster to the lowest position.
4. Remove the following parts:
a. Front scuff plate.
b. Rear scuff plate.
c. B-pillar lower trim.
d. Front seat belt upper anchor installation bolt.
e. B-pillar upper trim.
5. Remove bolt A.
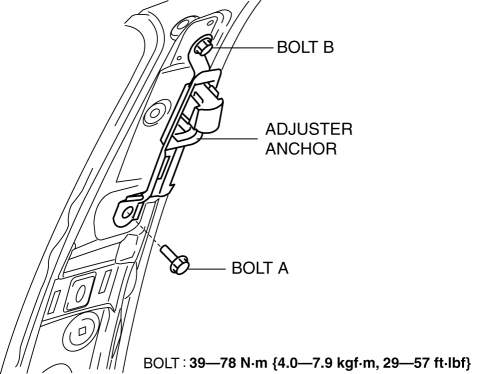
6. Remove bolt B.
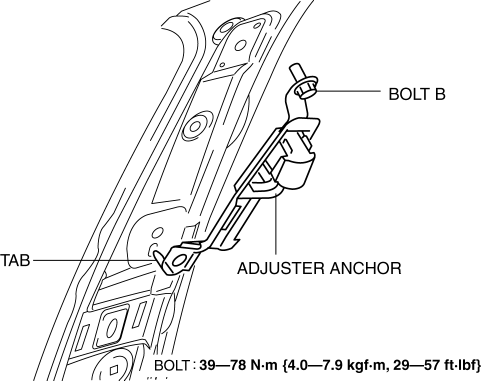
7. Remove the tab.
8. Remove the adjuster anchor.
9. Install in the reverse order of removal.
 Restraints SST
49 H066 002
Deployment tool
49 B066 004
Adapter harness
49 L066 002
Adapter harness
49 G066 ...
 Air Bag Module And Pre Tensioner Seat Belt Deployment Procedures [Standard Deployment
Control System]
Air Bag Module And Pre Tensioner Seat Belt Deployment Procedures [Standard Deployment
Control System]
WARNING:
A live (undeployed) air bag module or pre-tensioner seat belt may accidentally
operate (deploy) when it is disposed of and cause serious injury. Do not dispose
of a live (undepl ...
Other materials:
Front Side Frame (Partial Cutting) Removal [Panel Replacement]
Symbol Mark
Removal Procedure
1. Drill the 4 locations indicated by (A) shown in the figure, then remove suspension
mounting reinforcement and outer frame reinforcement.
2. Rough cut location indicated by (B) shown in the figure.
3. Drill the 6 locations indicated by (C) shown in the fig ...
Bsm Indicator Light Flashes While Not Under Bsm Indicator Light Flashing Conditions
(No Combination Switch Operation (Turn Signal Switch)) [Blind Spot Monitoring (Bsm)]
Description
BSM indicator light flashes while not under BSM indicator light-flashing
conditions (no combination switch operation (turn signal switch)
The BSM indicator light flashes despite not satisfying the BSM indicator
light flashing ...
Blind Spot Monitoring (Bsm) Off Indicator Light
Purpose
The BSM OFF indicator light informs the driver that the Blind Spot Monitoring
(BSM) system is turned off or there is a malfunction in the system.
Function
The instrument cluster illuminates the BSM OFF indicator light based on the
BSM system off signal sent via a CA ...
