Mazda CX-5 Service & Repair Manual: ABS Control
Outline
-
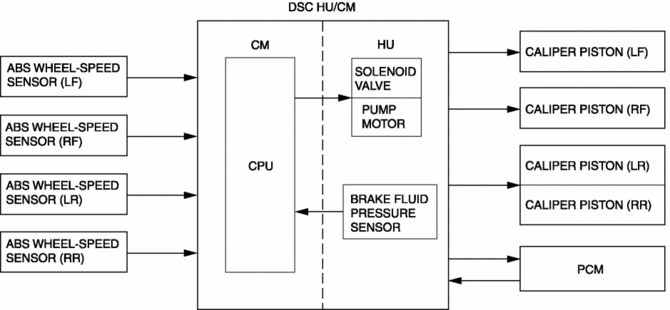
ABS control occurs when wheel slip is determined by the DSC CM (based on the four ABS wheel-speed sensors). Then, the DSC HU inlet and outlet solenoid valves are operated and brake fluid pressure is controlled accordingly to prevent wheel lock-up.
Feature
-
Use of ABS control during emergency braking or on slippery road surfaces allows directional stability to be maintained, steerability ensured, and stopping distance to be reduced.
-
The ABS control system has independent front wheel control and unified control (select low) for the rear wheels.
NOTE:
-
Select low control: A control system in which the left and right vehicle wheel speeds are compared and brake fluid pressure is controlled according to the wheel most likely to lock-up.
-
Construction
Block Diagram
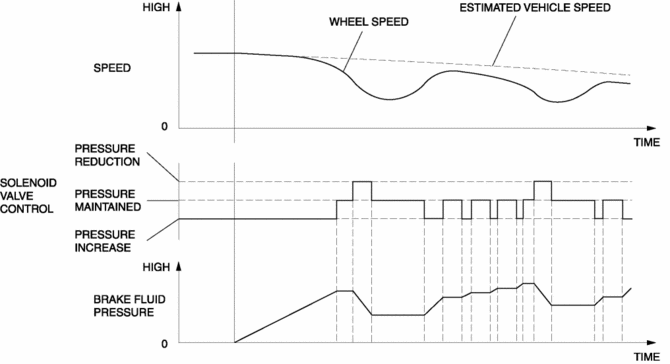
Operation
-
When the DSC CM determines wheel slip conditions based on the signals from the ABS wheel-speed sensors during braking, the DSC CM operates the DSC HU inlet and outlet solenoid valves, reducing and maintaining brake fluid pressure in accordance with the wheel slip factors. Then, when the wheel slip condition has passed, brake fluid pressure is increased and maintained, ensuring braking with a constantly stable brake force.
Control condition transition diagram
 ABS
ABS
...
 ABS Wheel Speed Sensor And ABS Sensor Rotor
Purpose/Function
The ABS wheel-speed sensor and ABS sensor rotor detect the rotation condition
of each wheel and transmit this information to the DSC HU/CM.
The signal from the ABS w ...
Other materials:
Clutch Fluid Replacement/Air Bleeding [C66 M R]
CAUTION:
Do not allow clutch fluid to get on a painted surface. Clutch fluid contains
properties which can dissolve the paint. If clutch fluid gets on a painted surface,
wash it off with water immediately and wipe the area off completely.
Do not mix different types of clutch fl ...
Low Clutch [Fw6 A EL, Fw6 Ax EL]
Purpose/Function
The low clutch operates in 1GR, 2GR, 3GR and 4GR and intermittently operates
the sun gear by drive force from the turbine shaft.
For the low clutch, a centrifugal balance clutch has been adopted to prevent
clutch drag and to assure stabilized piston thrust in al ...
TCM Configuration [Fw6 A EL, Fw6 Ax EL]
NOTE:
The TCM is built into the control valve body.
1. Verify TCM configuration implementation necessity for replacement parts.
Replacement part
Configuration necessity
Control valve body replacement
Necessary
...
