Mazda CX-5 Owners Manual: Towing Description
We recommend that towing be done only by an Authorized Mazda Dealer or a commercial tow-truck service.
Proper lifting and towing are necessary to prevent damage to the vehicle.
Particularly when towing a AWD vehicle, where all the wheels are connected to the drive train, proper transporting of the vehicle is absolutely essential to avoid damaging the drive system. Government and local laws must be followed.
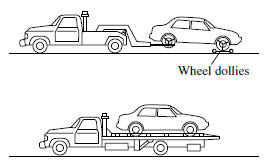
A towed 2WD vehicle should have its drive wheels (front wheels) off the ground. If excessive damage or other conditions prevent this, use wheel dollies.
When towing a 2WD vehicle with the rear wheels on the ground, release the parking brake.
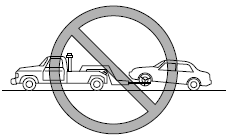
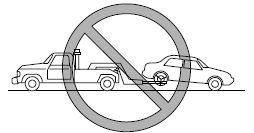
A towed AWD vehicle must have all its wheels off the ground.
WARNING
Always tow a AWD vehicle with all four wheels off the ground:
Towing a AWD vehicle with either the front or rear wheels on the ground is dangerous as the drive train could be damaged, or the vehicle could trail away from the tow truck and cause an accident. If the drive train has been damaged, transport the vehicle on a flat bed truck.
CAUTION
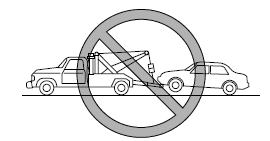
●Do not tow the vehicle pointed backward with driving wheels on the ground. This may cause internal damage to the transaxle.
● Do not tow with sling-type equipment. This could damage your vehicle. Use wheel-lift or flatbed equipment.
 Emergency Towing
...
 Tiedown Hooks
CAUTION
Do not use the front and rear tiedown eyelets for towing the vehicle.
They have been designed only for securing the vehicle to a transport vessel during
shipping.
Using the eyelets for an ...
Other materials:
Condenser Removal/Installation
1. Disconnect the negative battery cable..
2. Discharge the refrigerant..
3. Remove the front under cover No.1..
4. Drain the engine coolant..
5. Remove the following parts:
a. Plug hole plate.
b. Air cleaner, air hose and fresh air duct component.
c. Coolant reserve tank.
d. Cooling ...
Clutch Fluid Inspection [C66 M R]
NOTE:
A common reserve tank is used for the clutch system and brake system.
1. Verify that the clutch fluid is between the MIN mark and the MAX mark.
Verify that there is no clutch fluid leakage then add clutch fluid to the
level between the MIN mark and the MAX mark..
...
Front Seat Back Trim Removal/Installation
WARNING:
Handling a side air bag improperly can accidentally operate (deploy) the
air bag, which may seriously injure you. Read the service warnings/cautions
in the Workshop Manual before handling the front seat (side air bag integrated)..
If the sliding mechanisms on both ...
