Mazda CX-5 Service & Repair Manual: Precaution
Intermittent Concern Troubleshooting
Vibration method
-
If a malfunction occurs or becomes worse while driving on a rough road or when the engine is vibrating, perform the following steps.
NOTE:
-
There are several reasons why vehicle or engine vibration could cause an electrical malfunction. Inspect the following:
-
Connectors not fully seated.
-
Wiring harnesses not having full play.
-
Wires laying across brackets or moving parts.
-
Wires routed too close to hot parts.
-
An improperly routed, improperly clamped, or loose wiring harness can cause wiring to become pinched between parts.
-
The connector joints, points of vibration, and places where wiring harness pass through the firewall, body panels and other panels are the major areas to be inspected.
Inspection method for switch and/or sensor connectors or wires
1. Connect the M-MDS to the DLC-2.
2. Turn the ignition switch to the ON position (engine off).
NOTE:
-
If the engine starts and runs, perform the following steps at idle.
3. Access PIDs for the switch you are inspecting.
4. Turn the switch on manually.
5. Slightly shake each connector or wiring harness vertically and horizontally while monitoring the PID.
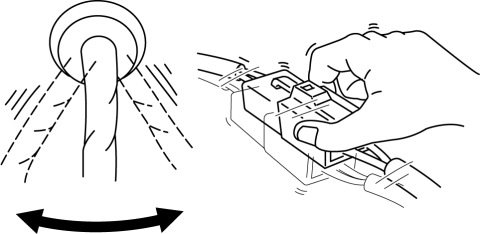
-
If the PID value is unstable, inspect for poor connection.
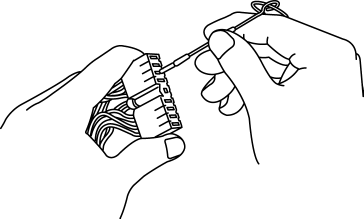
Inspection method for sensors
1. Connect the M-MDS to the DLC-2.
2. Turn the ignition switch to the ON position (engine off).
NOTE:
-
If the engine starts and runs, perform the following steps at idle.
3. Access PIDs for the switch you are inspecting.
4. Vibrate the sensor slightly with your finger.
-
If the PID value is unstable or a malfunction occurs, inspect for poor connection and/or poorly mounted sensor.
Connector terminal inspection method
1. Inspect the connection of each female terminal.
2. Insert the male terminal to the female terminal and inspect the female terminal for looseness.
 General Procedures (Steering)
WARNING:
Always inspect the steering component carefully for any shock or impact which
may have occurred during a collision or servicing operation. If a damaged part
or a part suspected ...
 Steering Abbreviations
AAS
Active Adaptive Shift
ABS
Antilock Brake System
ABDC
After Bottom Dead Center
ACC
Access ...
Other materials:
Clutch Fluid Inspection [C66 M R]
NOTE:
A common reserve tank is used for the clutch system and brake system.
1. Verify that the clutch fluid is between the MIN mark and the MAX mark.
Verify that there is no clutch fluid leakage then add clutch fluid to the
level between the MIN mark and the MAX mark..
...
Audio Amplifier Removal/Installation
1. Disconnect the negative battery cable..
2. Remove the following parts:
a. Front scuff plate (RH).
b. Front side trim (RH).
3. Remove the bolts.
4. Lift up the audio amplifier in the direction of the arrow (1) shown in the
figure, pull it in the direction of the arrow (2) shown in ...
Cowl Upper Plate Removal [Panel Replacement]
Symbol Mark
Removal Procedure
1. Drill the 9 locations indicated by (A) shown in the figure.
2. Drill the 2 locations by (B) from the front wheel housing side shown in the
figure.
3. Drill the 2 locations indicated by (C) from the inside shown in the figure.
4. Remove the cowl upp ...
