Mazda CX-5 Service & Repair Manual: Power Outer Mirror Removal/Installation
1. Disconnect the negative battery cable..
2. Remove the inner garnish..
3. Remove the front door trim..
4. Insert a tape-wrapped flathead screwdriver into the service hole and remove hooks A in the direction of arrow (1).
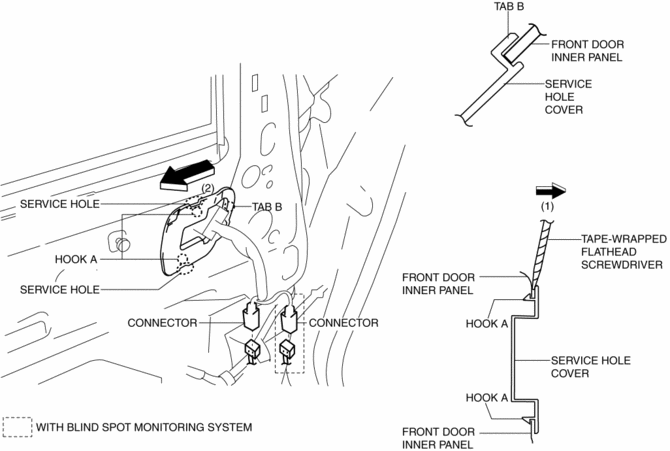
5. Slide the service hole cover in the direction of the arrow (2) shown in the figure and remove tab B.
6. Disconnect the connector.
7. Remove nuts C.
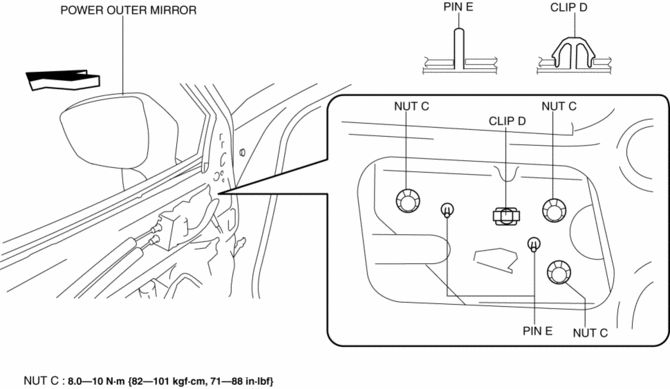
8. Pull the power outer mirror in the direction of the arrow while remove clips D, pin E.
CAUTION:
-
If the clip D of the power outer mirror is detached, the power outer mirror may fall off and be damaged. When detaching clip D of the power outer mirror, hold the power outer mirror by hand during the servicing.
9. Install in the reverse order of removal.
 Power Outer Mirror Inspection
Mirror Glass Adjustment
1. Disconnect the negative battery cable..
2. Remove the following parts:
a. Inner garnish.
b. Front door trim.
c. Power outer mirror.
3. Apply battery positive volt ...
 Power Outer Mirror System
Outline
Power outer mirrors which can be operated remotely have been adopted.
Structural view
System wiring diagram
Function
Mirror glass adjustment function
Outer mirro ...
Other materials:
Clock Inspection
1. Disconnect the negative battery cable..
2. Remove the following parts:
a. Shift lever knob (MTX).
b. Front console box.
c. Shift panel.
d. Upper panel.
e. Rear console.
f. Side wall.
g. Decoration panel.
h. Front console.
i. Glove compartment.
j. Climate control unit.
3. C ...
Fresh Air Duct
Purpose, Function
Conducts fresh air from outside the engine compartment.
Increases air density by taking fresh air, which is cooler than the engine
compartment, to enhance the charging efficiency, ensuring the combustion stability.
Construction
The fresh-air duct is i ...
Center Pillar Installation [Panel Replacement]
Symbol Mark
Installation Procedure
1. When installing new parts, measure and adjust the body as necessary to conform
with standard dimensions.
2. Drill holes for the plug welding before installing the new parts.
3. After temporarily installing new parts, make sure the related parts fit p ...
