Mazda CX-5 Owners Manual: Mirrors
Mirrors
Before driving, adjust the inside and outside mirrors.
Outside Mirrors
WARNING
Be sure to look over your shoulder before changing lanes: Changing lanes without taking into account the actual distance of the vehicle in the convex mirror is dangerous. You could have a serious accident. What you see in the convex mirror is closer than it appears.
Mirror type
Flat type (driver's side)
Flat surface mirror.
Convex type (front passenger side)
The mirror has single curvature on its surface.
Power mirror adjustment
The ignition must be switched to ACC or ON position.
To adjust:
1. Rotate the mirror adjusting switch to the left or right to choose the left or right side mirror.
2. Depress the mirror switch in the appropriate direction.
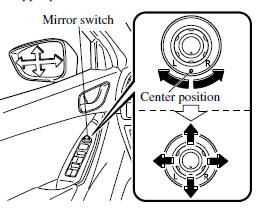
After adjusting the mirror, lock the control by rotating the switch in the center position.
Folding mirror
WARNING
Always return the outside mirrors to the driving position before you start driving:
Driving with the outside mirrors folded in is dangerous. Your rear view will be restricted, and you could have an accident.
Fold the outside mirror rearward until it is flush with the vehicle.

Rearview Mirror
WARNING
Do not stack cargo or objects higher than the seatbacks:
Cargo stacked higher than the seatbacks is dangerous. It can block your view in the rearview mirror, which might cause you to hit another car when changing lanes.
Rearview mirror adjustment
Before driving, adjust the rearview mirror to center on the scene through the rear window.

NOTE
For the manual day/night mirror, perform the adjustment with the day/night lever in the day position.
Reducing glare from headlights
Manual day/night mirror
Push the day/night lever forward for day driving. Pull it back to reduce glare of headlights from cars at the rear.

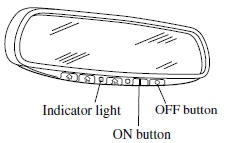
Auto-dimming mirror
The auto-dimming mirror automatically reduces glare of headlights from cars at the rear when the ignition is switched ON.
Press the OFF button ( ) to cancel the automatic dimming function. The indicator light will turn off.
To reactivate the automatic dimming function, press the ON button ( ). The indicator light will illuminate.
NOTE
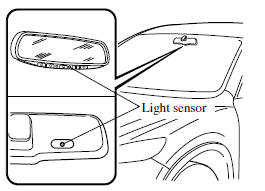
• Do not use glass cleaner or suspend objects on or around the light sensor. Otherwise, light sensor sensitivity will be affected and may not operate normally.
• For information regarding the 3 buttons
( ) on the auto-dimming mirror.
Refer to HomeLink Wireless Control System 3.
• The auto-dimmer function is canceled when the ignition is switched ON and the shift lever/selector lever is in reverse (R).
 Steering Wheel
Steering Wheel
WARNING
Never adjust the steering wheel while the vehicle is moving: Adjusting the steering
wheel while the vehicle is moving is dangerous.
Moving it can very easily cause the driv ...
 Windows
...
Other materials:
Driver and Front Passenger Occupant Classification System
First, please read “Supplemental Restraint System (SRS) Precautions” carefully.
Driver Seat Slide Position Sensor
Your vehicle is equipped with a driver seat slide position sensor as a part of
the supplemental restraint system. The sensor is located under the driver seat.
The sensor ...
Liftgate Latch And Lock Actuator Removal/Installation
1. Disconnect the negative battery cable..
2. Remove the following parts:
a. Liftgate upper trim.
b. Liftgate side trim.
c. Liftgate lower trim.
3. Disconnect the connector.
4. Remove the bolts.
5. Remove the liftgate latch and lock actuator from the liftgate.
6. Install in t ...
Theft-Deterrent System
If the theft deterrent system detects an inappropriate entry into the vehicle,
which could result in the vehicle or its contents being stolen, the alarm alerts
the surrounding area of an abnormality by sounding the horn and flashing the hazard
warning lights.
The system will not function unle ...
