Mazda CX-5 Service & Repair Manual: Manual Transaxle Oil Replacement [C66 M R]
1. Park the vehicle on level ground.
2. Remove the front under cover No.2..
3. Remove the drain plug and gasket, and drain the manual transaxle oil.
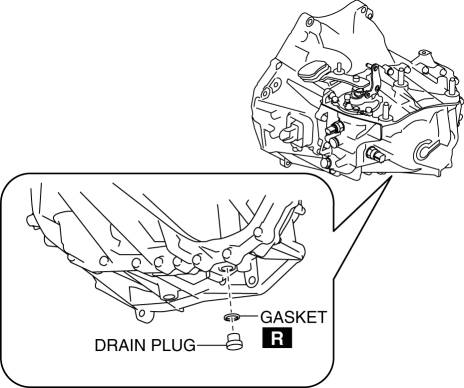
4. Install a new gasket and the drain plug.
-
Tightening torque
-
39—59 N·m {4.0—6.0 kgf·m, 29—43 ft·lbf}
5. Remove the oil level plug and gasket.
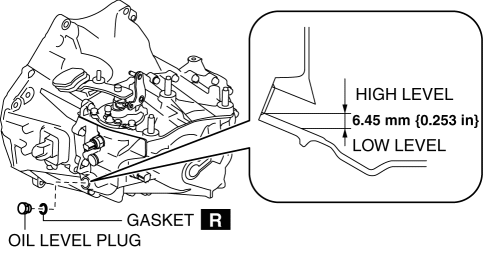
6. Add the specified manual transaxle oil through the oil level plug port.
-
Manual transaxle oil grade
-
API service GL-4
-
Manual transaxle oil viscosity
-
SAE 75W-80
-
Manual transaxle oil capacity (approx. quantity)
-
1.65 L {1.74 US qt, 1.45 lmp qt}
7. Install a new gasket and the oil level plug.
-
Tightening torque
-
39—59 N·m {4.0—6.0 kgf·m, 29—43 ft·lbf}
8. Install the front under cover No.2..
 Manual Transaxle Oil Inspection [C66 M R]
1. Park the vehicle on level ground.
2. Remove the front under cover No.2..
3. Remove the oil level plug and gasket.
4. Verify that the manual transaxle oil is near the brim of the plug port ...
 Manual Transaxle Removal/Installation [C66 M R]
Removal
1. Disconnect the negative battery cable..
2. Remove the plug hole plate..
3. Remove the front under cover No.2..
4. Remove the front under cover No.1..
5. Remove the splash shield.. ...
Other materials:
Glass/Windows/Mirrors
Outline
The following glass has been adopted.
Windshield
Front door glass
Rear door glass
Rear door quarter glass
Quarter window glass
Rear window glass
Outer mirror glass
The following mirrors h ...
Forced Ignition On
NOTE:
In order to perform a forced ignition ON, the M-MDS is necessary. If the
servicing is being done outside of an Authorized Mazda dealership, contact an
Authorized Mazda dealership for instructions.
The forced ignition ON procedure forces a power supply to each part when
...
Floor Side Panel Installation [Panel Replacement]
Symbol Mark
Installation Procedure
1. When installing new parts, measure and adjust the body as necessary to conform
with standard dimensions.
2. Drill holes for the plug welding before installing the new parts.
3. After temporarily installing new parts, make sure the related parts fit p ...
