
Mazda CX-5 Service & Repair Manual: Filament Repair
1. Clean the filament using isopropyl alcohol.
2. Attach tape to both sides of the filament.
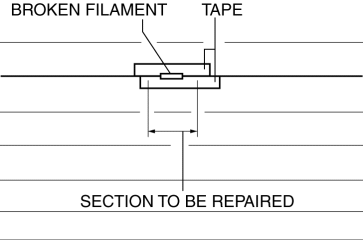
3. Using a small brush or marking pen, apply silver paint.
4. After 2—3 min,
carefully remove the tape without damaging the applied area.
CAUTION:
-
Do not operate the rear window defroster until the paint is completely dry. It may cause other malfunctions if it is used before the paint is dry.
5. Dry the repaired part according to the following procedure.
-
When the room temperature is 25 °C {77 °F},
leave it as it is for 24 h.
-
When a hot air blower is used, dry with the 150 °C {302 °F}
air for 30 min.
 Filament Inspection
1. Switch the ignition ON (engine off).
2. Turn the rear window defroster switch on.
CAUTION:
Directly touching the rear window defroster filament with the lead of the
tester could ...
 Front Door Glass Removal/Installation
1. Perform the front door glass preparation..
NOTE:
Before removing the front door glass, the removal procedure for the front
door glass installation bolt can be facilitated by adjusting ...
Other materials:
Airflow Mode Actuator Removal/Installation [Full Auto Air Conditioner]
1. Disconnect the negative battery cable..
2. Remove the following parts:
a. Dashboard under cover.
b. Glove compartment.
3. Disconnect the airflow mode actuator connector.
4. Remove the screw.
5. Remove the airflow mode actuator.
6. Remove the airflow mode main link.
7. Remo ...
Intake Air Temperature (Iat) Sensor
IAT Sensor No.1
Purpose/Function
Detects the IAT before it passes through the throttle body as basic information
for mainly determining the fuel injection amount.
Detects the IAT before it passes through the throttle body and inputs it
to the PCM as an IAT signal.
Constru ...
Air Bag System Warning Alarm [Two Step Deployment Control System]
Purpose
The air bag system warning alarm notifies the driver that a malfunction occurred
in the air bag system instead of the air bag system warning light.
Function
If a malfunction occurs in the air bag system while the air bag system warning
light cannot illuminate, the a ...
