Mazda CX-5 Service & Repair Manual: Discharge Headlight Control Module
Purpose
-
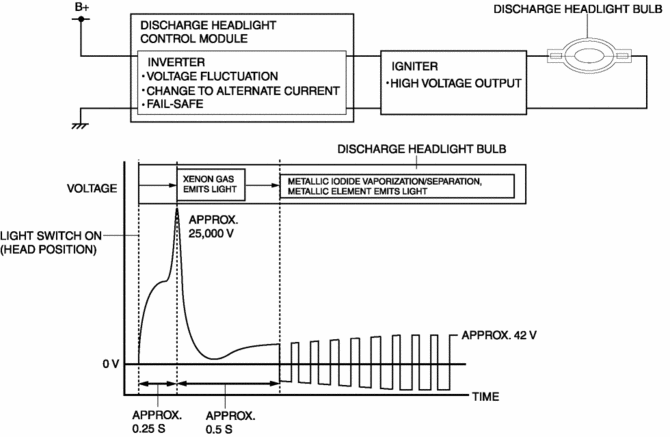
Converts DC voltage from the battery to AC voltage and outputs the stabilized voltage to the discharge headlight.
Function
-
The discharge headlight control module controls the voltage from the battery to illuminate the discharge headlight.
-
The discharge headlight control module has a fail-safe function which turns off the discharge headlight if an input/output voltage malfunction occurs for the prevention of part mis-operation and protection.
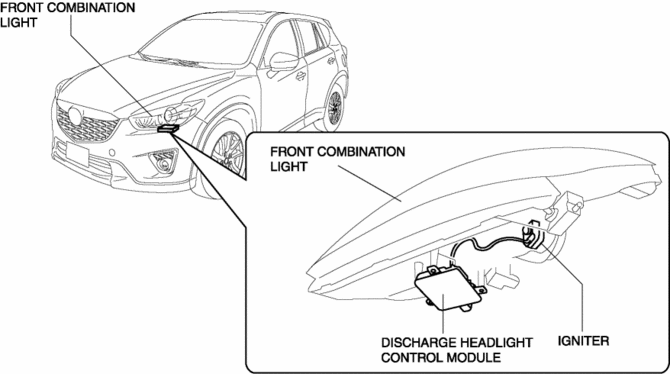
Construction
-
The discharge headlight control module consists of an igniter which raises the voltage from the battery to approx. 25,000 V, and an inverter which converts the DC voltage from the battery to AC voltage.
-
The inverter is integrated with the discharge headlight control module.
-
The igniter is installed to the discharge headlight bulb.
Operation
1. When the headlight relay (LO) turns on, the discharge headlight control module raises the DC voltage from the battery from approx. 12 V to approx. 25,000 V using the igniter, and outputs it to the discharge headlight bulb.
2. After the discharge headlight is illuminated, the discharge headlight control module converts the DC voltage from the battery to AC voltage (approx. 42 V) using the inverter, and outputs it to the discharge headlight bulb.
Fail-safe
-
If the following input/output voltage malfunctions occur, the fail-safe function is activated.
|
Operation condition
|
Fail-safe
|
Recovery condition
|
|
Input/output voltage from discharge headlight control module is outside of 6—18 V range. (Except for voltage reduction directly after discharge headlight illumination) |
Turns off discharge headlights |
Normal input voltage detected |
|
Malfunction is detected in output voltage from discharge headlight control module (open circuit or short to ground in wiring harness) |
Turns off discharge headlights |
Light switch turned to OFF, and then back to ON |
 Discharge Headlight Bulb
Purpose, Function
Charges the internal metallic element and emits white light resembling sunlight.
Construction
A mercury-free bulb has been adopted for the discharge headlight bul ...
 Discharge Headlight Control Module Removal/Installation
WARNING:
Incorrect servicing of the discharge headlights could result in electrical
shock. Before servicing the discharge headlights, always refer to the service
warnings..
1. Disc ...
Other materials:
Oil Pressure Inspection
WARNING:
Hot engines and engine oil can cause severe burns. Turn off the engine and
wait until it and the engine oil have cooled.
A vehicle that is lifted but not securely supported on safety stands is dangerous.
It can slip or fall, causing death or serious injury. Never work ...
Clutch Fluid Inspection [C66 M R]
NOTE:
A common reserve tank is used for the clutch system and brake system.
1. Verify that the clutch fluid is between the MIN mark and the MAX mark.
Verify that there is no clutch fluid leakage then add clutch fluid to the
level between the MIN mark and the MAX mark..
...
Fuel Pump Control
Outline
By switching the fuel pump discharge amount, reduced power consumption and
improved fuel economy have been realized.
The PCM determines the optimum fuel pump drive force according to the engine
operation conditions, and sends the fuel pump drive signal to the fuel pump
...
