Mazda CX-5 Service & Repair Manual: Dashboard Under Cover Removal/Installation
1. Detach hooks A in the direction of arrow (1) shown in the figure.
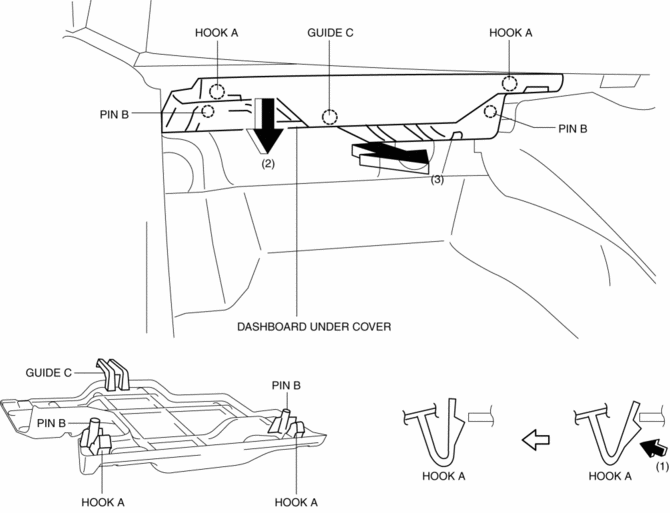
2. Pull the dashboard under cover in the direction of arrow (2) while detaching pins B.
3. Remove the dashboard under cover in the direction of the arrow (3) shown in the figure while detaching the guide C.
CAUTION:
-
If hooks A and pins B is removed forcefully, guide C may be damaged. Carefully remove hooks A and pins B so as not to damage guide C.
4. Install in the reverse order of removal.
 Dashboard Removal/Installation
1. Disconnect the negative battery cable..
2. Remove the following parts:
a. Windshield wiper arm and blade.
b. Cowl grille.
c. Windshield wiper motor.
d. Front scuff plate.
e. Front side ...
 Decoration Panel Removal/Installation
CAUTION:
Affix protective tape to the position shown in the figure.
1. Disconnect the negative battery cable..
2. Open the glove compartment.
3. Insert a tape-wrapped flathead ...
Other materials:
Heated Oxygen Sensor (HO2 S) Removal/Installation
WARNING:
A hot engine and exhaust system can cause severe burns. Turn off the engine
and wait until they are cool before removing the exhaust system.
CAUTION:
Do not allow flammable objects such as the taping for bundling wiring harness
to come into contact with the exhau ...
Hood Disassembly/Assembly
1. Disassemble in the order indicated in the table.
1
Fastener
2
Hood insulator
3
Shroud seaming welt
4
Weather strip parting seal
5
Hood component
...
Tire Pressure Warning Alarm
Purpose
The tire pressure warning alarm warns the user that a tire pressure has decreased
or notifies the user that the tire pressure warning alarm has been reset.
Function
If the instrument cluster receives a tire pressure warning alarm request
signal sent from the D ...
