Mazda CX-5 Service & Repair Manual: Blind Spot Monitoring (Bsm) Off Indicator Light
Purpose
-
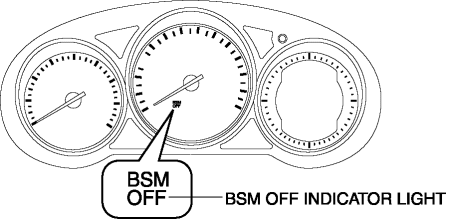
The BSM OFF indicator light informs the driver that the Blind Spot Monitoring (BSM) system is turned off or there is a malfunction in the system.
Function
-
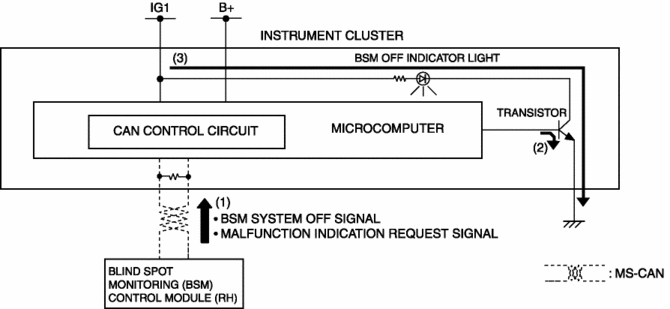
The instrument cluster illuminates the BSM OFF indicator light based on the BSM system off signal sent via a CAN signal from the BSM control module (RH).
-
The instrument cluster flashes the BSM OFF indicator light based on the malfunction indication request signal sent via a CAN signal from the BSM control module (RH).
-
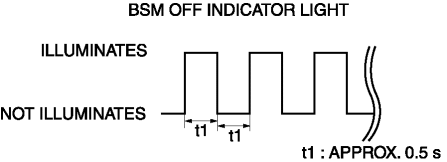
The flash pattern of the BSM OFF indicator light is as shown in the figure.
Construction
-
The BSM OFF indicator light are equipped in the instrument cluster.
Operation
-
The instrument cluster receives (1) the BSM system off signal or malfunction indication request signal from the BSM control module (RH) via the CAN signal.
-
The instrument cluster turns the transistor on (2) intermittently for a malfunction indication request signal and continuously for a BSM system off signal.
-
When the transistor turns on intermittently, the BSM OFF indicator light flashes (3) and when it turns on continuously, the BSM OFF indicator light illuminates (3).
Fail-safe
-
Function not equipped.
 Blind Spot Monitoring (Bsm) Control Module Removal/Installation
1. Disconnect the negative battery cable..
2. Remove the rear combination light..
3. Remove the rear bumper..
4. Disconnect the connector.
5. Remove the nuts.
6. Remove the BSM control m ...
 Blind Spot Monitoring (Bsm) Off Switch
Purpose
The blind spot monitoring (BSM) system can be turned on or off optionally
by the driver.
Function
The switch operation signal is sent to the instrument cluster.
Co ...
Other materials:
Forced Ignition On
NOTE:
In order to perform a forced ignition ON, the M-MDS is necessary. If the
servicing is being done outside of an Authorized Mazda dealership, contact an
Authorized Mazda dealership for instructions.
The forced ignition ON procedure forces a power supply to each part when
...
Washer Fluid Level Sensor
Purpose
The washer fluid-level sensor illuminates the low washer fluid level warning
light when the washer fluid level is lowered.
Function
The washer fluid-level sensor detects the decrease in the washer fluid level.
Construction
The washer fluid-level sensor con ...
Windshield Wiper Motor Inspection
1. Disconnect the negative battery cable..
2. Remove the following parts:
a. Windshield wiper arm and blade.
b. Cowl grille.
Windshield Wiper Motor Inspection
1. Apply battery positive voltage and connect the ground to the windshield wiper
motor terminals as indicated in the table below a ...
