Mazda CX-5 Service & Repair Manual: Airflow Temperature Control [Full Auto Air Conditioner]
Purpose
-
The airflow temperature control changes the airflow temperature according to the vehicle conditions.
Function
-
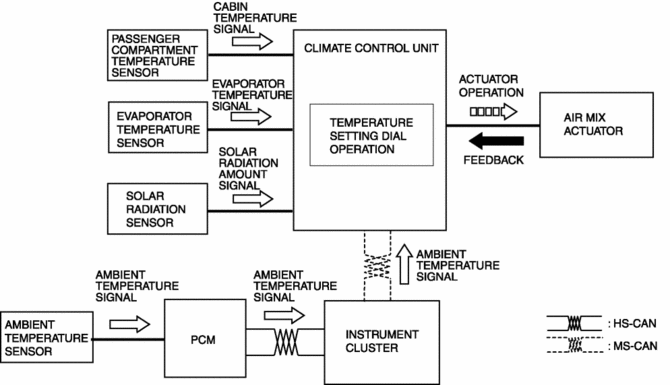
The air mix actuator is driven and the air mix door position is changed according to the set temperature and the vehicle environment.
-
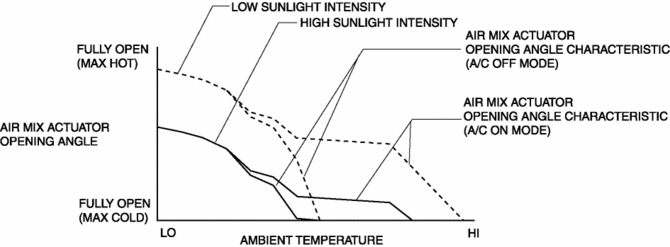
The climate control unit calculates the air mix actuator opening angle characteristic based on the set temperature, solar radiation amount, and airflow mode.
-
The air mix actuator opening angle characteristic is set lower as the sunlight intensity increases.
-
The airflow temperature is automatically controlled continuously.
-
The airflow temperature control performs the following corrections:
-
MAX HOT and MAX COLD correction
-
Engine coolant temperature correction
MAX HOT and MAX COLD correction
-
Under the MAX HOT and MAX COLD correction, the air mix actuator opening angle is fixed at fully open when the temperature is set to 32.0/90
, and fixed at fully closed when the temperature is set to 15/60
.
Engine coolant temperature correction
-
The engine coolant temperature correction prevents cold air from coming out of the air vents after the engine is started in winter.
-
When the engine coolant temperature is lower than the specified value, the air mix actuator opening angle is corrected to the HOT side.
-
The engine coolant temperature correction is not performed when the ambient temperature is 15 °C {59 °F}
or more.
Construction
-
The airflow temperature control consists of the parts indicated in the following table:
|
Input device |
Control part |
Output device |
|
|
|
Operation
1. The climate control unit determines the airflow temperature based on the temperature control dial operation and signals from each sensor which changes according to the vehicle environment.
2. The climate control unit drives the air mix actuator according to the results of the airflow temperature determination and corrections.
 Airflow Mode Control [Full Auto Air Conditioner]
Purpose
The airflow mode control changes the airflow mode according to the vehicle
environment.
Function
The airflow mode control drives the airflow mode actuator according to t ...
 Airflow Volume Control [Full Auto Air Conditioner]
Purpose
The airflow volume control changes the airflow volume according to the vehicle
environment.
Function
The airflow volume control changes the operation of the blower motor ...
Other materials:
Intermediate Shaft Removal/Installation
WARNING:
The steering column (EPS motor) temperature increases directly after continuous
turning of the steering mechanism which could cause burns if it is touched.
Before performing any servicing, verify that the steering column has cooled
off.
1. Rotate the steering wheel un ...
Intake Air System
Purpose, Outline
A vacuum pump has been adopted which supplies stable vacuum to the power
brake unit.
Structural View
System Diagram
Vacuum Hose Routing Diagram
Structure
The intake air system consists of the following parts:
Part na ...
Fuel Pump Unit
Purpose, Function
Supplies fuel in the fuel tank to the high pressure fuel pump.
Based on the control signal from the PCM, the fuel pump operates by the operation
of the fuel pump relay and the fuel pump control module.
Construction
2WD
The fuel pump unit is installed ...
