Mazda CX-5 Service & Repair Manual: Torque Converter [Fw6 A EL, Fw6 Ax EL]
Purpose/Function
-
By use of an optimized torus shape (wing) matching the output characteristics of the engine, the torque converter achieves efficient force transmission and reduced fuel consumption.
Construction/Operation
-
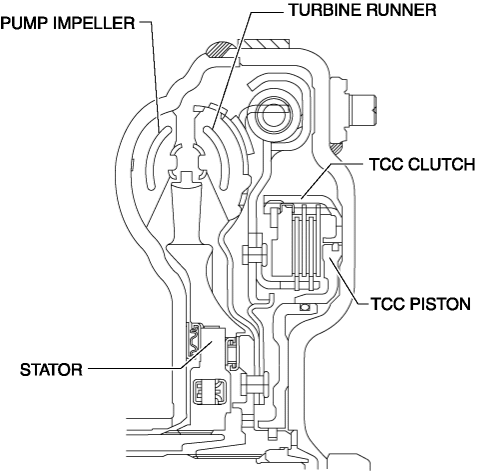
A three-member, single-stage two-phase type torque converter with a torque converter clutch (TCC) mechanism has been adopted.
-
Three-member: Indicates that the torque converter consists of a pump impeller, turbine runner, and stator.
-
Single stage: Indicates the number of turbine runners.
-
Two-phase: Indicates that there are two conditions; torque converter range and fluid coupling range.
TCC mechanism
-
A TCC piston built into the torque converter operates during TCC control. When hydraulic pressure is applied to the TCC piston, the TCC clutch engages to mechanically connect the pump impeller to the turbine runner. The TCC mechanism achieves excellent fuel economy as a result of no loss in drive force transmission due to torque converter slippage. In addition, precise hydraulic control is made possible by a multi-plate clutch equipped with an independent piston housing. With the adoption of this mechanism, the achievable range of TCC control has widened dramatically.
 Torque Converter Clutch (TCC) Control [Fw6 A EL, Fw6 Ax EL]
Outline
For TCC control, a newly developed, full range TCC control has been adopted.
The TCC range has been significantly widened by having the smoothness unique
to the torque converter d ...
 Transmission/Transaxle Abbreviations
AAS
Active Adaptive Shift
ABS
Antilock Brake System
ABDC
After Bottom Dead Center
ACC
Access ...
Other materials:
Front Stabilizer Control Link Inspection
1. Remove the front stabilizer control link..
2. Inspect for bending or damage. If there is any malfunction, replace the front
stabilizer control link.
3. Rotate the front stabilizer control link ball joint stud 10 times and
shake it side to side 10 times.
4. Measure the front stabilizer c ...
Seat Weight Sensor Calibration [Two Step Deployment Control System]
CAUTION:
If any of the following work is performed, perform the seat weight sensor
calibration using the M-MDS.
Replacement with a new seat weight sensor
Replacement with a new seat weight sensor control module
Replacement with new passenger-side seat pa ...
Rear Parking Brake Cable Removal/Installation
1. Remove the front console box..
2. Remove the shift lever knob. (MTX).
3. Remove the shift panel..
4. Remove the upper panel..
5. Remove the rear console..
6. Loosen the adjusting nut.
7. Remove the floor under cover No.2..
8. Remove in the order indicated in the table.
9. Install ...
