
Mazda CX-5 Service & Repair Manual: Tire Pressure Monitoring System Initialization Procedure
-
Perform the tire pressure monitoring system initialization when the following operations have been performed:
-
Tire pressures have been adjusted
-
Tires or wheels have been replaced
-
Tires have been rotated
-
DSC HU/CM replaced
-
DSC HU/CM connector disconnected
-
Battery replaced
-
Negative battery cable is disconnected
1. Park the vehicle on safe, level ground.
2. Adjust all four tire pressures to the specification while the tires are cold..
3. Switch the ignition ON (engine off or on).
4. Press and hold the tire pressure monitoring system set switch.
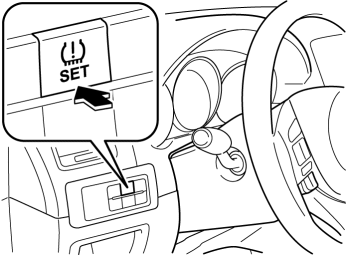
5. Press and hold the tire pressure monitoring system set switch until the tire pressure monitoring system warning light flashes 1 or 2 times and the indicator alarm sounds 1 time.
NOTE:
-
When the tire pressure monitoring system initialization is performed, learning initiates. Learning is completed by driving the vehicle for 20 min.
-
While the tire pressure monitoring system is undergoing learning, its primary functions do not operate.
 Tire Pressure Monitoring System (TPMS)
Purpose, Outline
The tire pressure monitoring system monitors the tire pressure of all 4 tires.
If the tire pressure of 1 tire or more becomes excessively low, the driver is
notified.
...
 Tire Pressure Monitoring System Set Switch
Purpose
The tire pressure monitoring system set switch is used to initialize the
tire pressure monitoring system.
Construction, Operation
The tire pressure monitoring syst ...
Other materials:
Air Intake Actuator Inspection [Manual Air Conditioner]
1. Connect battery positive voltage to air intake actuator terminal B (or C),
connect terminal C (or B) to ground, and then verify that the air intake actuator
operates as shown in the table.
If the operation condition is not normal, replace the air intake actuator.
...
Shroud Side Member Installation [Panel Replacement]
Symbol Mark
Installation Procedure
1. When installing new parts, measure and adjust the body as necessary to conform
with standard dimensions.
2. Drill holes for the plug welding before installing the new parts.
3. After temporarily installing new parts, make sure the related parts fit p ...
Auto Wiper System
Outline
The auto wiper system detects the amount of rainfall on the windshield and
automatically operates the windshield wipers intermittently or at low/high speed
and stops. Using the sensitivity adjustment function of the rain sensor, the
operation speed and the intermittent period ...
