
Mazda CX-5 Service & Repair Manual: Tcs Off Switch, Tcs Off Indicator Light
Purpose/Function
-
The TCS OFF switch, located on the dashboard, allows for optionally enabling/disabling the TCS control at driver discretion.
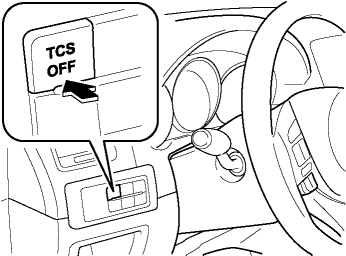
-
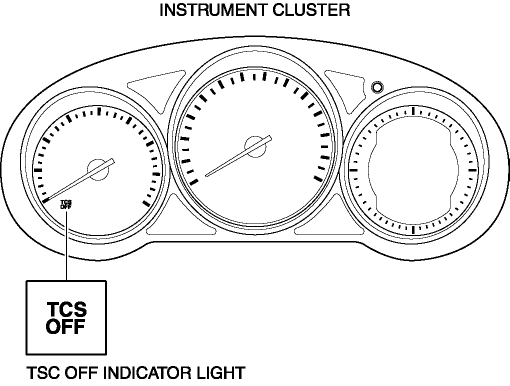
The TCS OFF indicator light, built into the instrument cluster, informs the driver that TCS control has been disabled by operation of the TCS OFF switch.
Operation
-
When the DSC system and CAN lines are functionally normally, the TCS OFF indicator light illuminates for approx. 3.0 s when the ignition is switched to ON to check the light function.
-
When the TCS OFF switch is pressed to disable TCS control, the TCS OFF indicator light illuminates.
NOTE:
-
To inhibit the TCS control, continue to press the TCS OFF switch until the TCS OFF indicator light illuminates.
-
The TCS OFF indicator light illumination and TCS/DSC/roll over mitigation (ROM) control conditions while operating the TCS OFF switch are as indicated in the table.
|
TCS OFF indicator light illumination conditions |
TCS control conditions |
DSC control conditions |
Roll over mitigation (ROM) control conditions |
||
|
Brake control |
Engine control |
||||
|
TCS ON |
Not illuminated |
Permitted |
Permitted |
Permitted |
Permitted |
|
TCS OFF |
Illuminated |
Permitted |
Inhibited |
Permitted |
Permitted |
Fail-safe
|
DTC No. |
Fail-safe function |
|
C0089:64 |
|
 Shift Position Indicator Light [Fw6 A EL, Fw6 Ax EL]
Purpose/Function
The shift position indicator light indicates the selector lever position.
Construction
The shift position indicator light is built into the instrument cluster.
...
 Tcs/DSC Indicator Light
Purpose/Function
The TCS/DSC indicator light, built into the instrument cluster, informs the
driver of the following vehicle conditions.
TCS is operating. (Drive wheel is slippi ...
Other materials:
Blind Spot Monitoring (Bsm) Warning Alarm
Purpose
The Blind Spot Monitoring (BSM) warning alarm warns the driver of a possible
accident.
Function
If the instrument cluster receives a warning sound request signal from the
BSM control module (RH), it sounds the BSM warning alarm using the buzzer in
the instrument ...
Power Outer Mirror Removal/Installation
1. Disconnect the negative battery cable..
2. Remove the inner garnish..
3. Remove the front door trim..
4. Insert a tape-wrapped flathead screwdriver into the service hole and remove
hooks A in the direction of arrow (1).
5. Slide the service hole cover in the direction of the arrow ( ...
License Plate Light
Purpose
The license plate lights shine light on the license plate during nighttime
driving.
Function
The license plate lights illuminate in conjunction with the operation of
the light switch.
Construction
The license plate lights are installed to the liftgate.
...
