
Mazda CX-5 Service & Repair Manual: Steering Gear And Linkage Removal/Installation
CAUTION:
-
Performing the following procedures without first removing the ABS wheel-speed sensor may possibly cause an open circuit in the wiring harness if it is pulled by mistake. Before performing the following procedures, disconnect the ABS wheel-speed sensor (axle side) and fix the wiring harness to an appropriate place where it will not be pulled by mistake while servicing the vehicle.
-
Secure the steering wheel using tape or a cable to prevent the steering shaft from rotating after disconnecting the steering shaft. If the steering wheel rotates after the steering shaft and the steering gear and linkage are disconnected, the internal parts of the clock spring could be damaged.
1. Remove the joint cover..
2. Disconnect the intermediate shaft from the steering gear and linkage..
3. Disconnect the front ABS wheel-speed sensor wiring harness installed to the steering knuckle and set it aside..
4. Remove the front under cover No.2..
5. Remove the front under cover No.1..
6. Remove the splash shield..
7. Remove the front crossmember component..
8. Remove in the order indicated in the table.
9. Install in the reverse order of removal.
10. After installation, inspect the front wheel alignment..
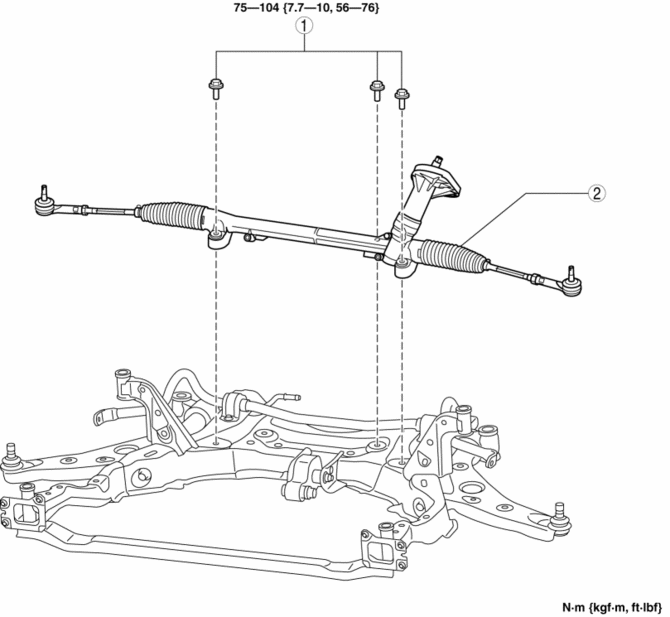
|
1 |
Steering gear and linkage installation bolt |
|
2 |
Steering gear and linkage (See Steering Gear and Linkage Removal Note.) |
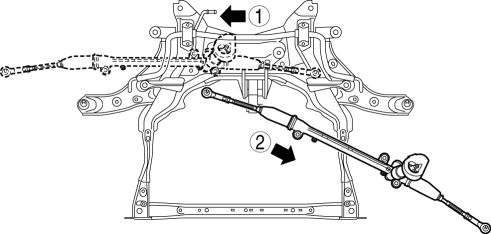
Steering Gear and Linkage Removal Note
1. Remove the steering gear and linkage installation bolts, move the steering gear and linkage in the direction and order of the arrows shown in the figure, and then remove it.
 Steering Gear And Linkage Inspection
1. Remove the steering gear and linkage..
2. Remove the tie-rod end and boot..
3. Measure the rotation torque of the pinion shaft using a crescent wrench and
pull scale. (speed measurement refer ...
 Wheel, Column
...
Other materials:
Manual Transaxle Operation
Manual Transaxle Shift Pattern
The shift pattern of the transaxle is conventional, as shown.
Depress the clutch pedal all the way down while shifting; then release it slowly.
Your vehicle is equipped with a device to prevent shifting to R (reverse) by
mistake.
Push the shift lever downward a ...
Front Fender Junction Installation [Panel Replacement]
Symbol Mark
Installation Procedure
1. When installing new parts, measure and adjust the body as necessary to conform
with standard dimensions.
2. Drill holes for the plug welding before installing the new parts.
3. After temporarily installing new parts, make sure the related parts fit p ...
Manual Transaxle Shift Mechanism Removal/Installation [C66 M R]
1. Disconnect the negative battery cable..
2. Remove the shift lever using the following procedure:
a. Remove the upper panel..
b. Remove the shift lever knob.
c. Remove the shift panel..
d. Remove the side wall..
e. Remove the rear console..
f. Press the tabs on the control cable ...
