Mazda CX-5 Service & Repair Manual: Steering Gear And Linkage Inspection
1. Remove the steering gear and linkage..
2. Remove the tie-rod end and boot..
3. Measure the rotation torque of the pinion shaft using a crescent wrench and pull scale. (speed measurement reference 5 В°/s
)
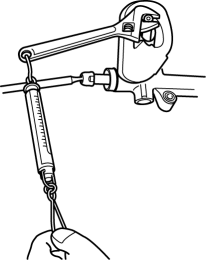
a. Install the crescent wrench to the steering gear.
b. Measure the length from the pinion shaft center to the crescent wrench end (application point of pull scale) as shown in the figure. This is dimension A.

c. The rotation torque of the pinion shaft can be calculated using the following formula Measured value using pull scale (N {kgf, lbf}) = rotation torque of the pinion shaft (NВ·m {kgfВ·cm, inВ·lbf})/length A (m {cm, in})
-
Pinion shaft rotation torque (center of rack В± 180В°)
-
1.0—1.6 N·m {11—16 kgf·cm, 8.9—14 in·lbf} [Pull scale reading: 1.0—1.6 N·m {11—16 kgf·cm, 8.9—14 in·lbf}/A (m {cm, in})]
-
If not within the specification, replace the steering gear..
 Steering Gear And Linkage Disassembly
CAUTION:
To prevent damage to the steering gear, secure it to the vise using a copper
plate or clean cloth.
1. Disassemble in the order indicated in the figure.
1
...
 Steering Gear And Linkage Removal/Installation
CAUTION:
Performing the following procedures without first removing the ABS wheel-speed
sensor may possibly cause an open circuit in the wiring harness if it is pulled
by mistake. Before ...
Other materials:
Engine Disassembly/Assembly
CAUTION:
When the transaxle is installed, do not suspend the engine. Otherwise, the
SST installation area of the cylinder head may be damaged due to excess weight.
Only suspend the engine after separating the engine and transaxle.
Applying excessive force (force of 100 N {10.2 ...
Front Drive Shaft Removal/Installation
CAUTION:
Performing the following procedures without first removing the ABS wheel-speed
sensor may possibly cause an open circuit in the wiring harness if it is pulled
by mistake. Before performing the following procedures, disconnect the ABS wheel-speed
sensor connector (axle side) ...
Driving on Uneven Road
Your vehicle's suspension and underbody can be damaged if driven on rough/uneven
roads or over speed bumps at excessive speeds. Use care and reduce speed when traveling
on rough/uneven roads or over speed bumps.
Use care not to damage the vehicle's underbody, bumpers or muffler(s) when ...
