Mazda CX-5 Service & Repair Manual: Seat Track Position Sensor [Two Step Deployment Control System]
Purpose
-
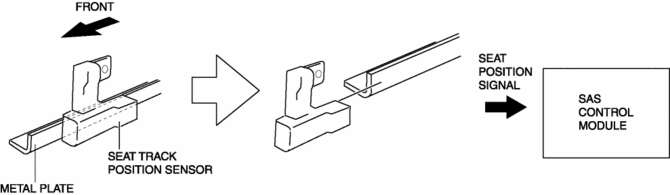
The seat track position sensor detects the front and back positions of the driver seat.
Function
-
The seat track position sensor converts the seat position into an electrical signal and sends it to the SAS control module.
Construction
-
The seat track position sensor consists of a hall element (semi-conductor) and a magnet. The sensor converts the effect of the magnetic flux (produced by the magnet) on the hall element, into an electrical signal.
-
The seat track position sensor installed on the driver-side seat rail.

Operation
-
If the driver’s seat is slid forward, the seat track position sensor will separate from the metal plate installed to the seat slider.
-
When this occurs the magnetic flux of the sensor changes and that change is sent as an electrical signal to the SAS control module.
-
The SAS control module receives this signal and determines that the driver’s seat has been moved to a forward position.
Fail-safe
-
Function not equipped.
 Seat Track Position Sensor Removal/Installation [Two Step Deployment Control
System]
Seat Track Position Sensor Removal/Installation [Two Step Deployment Control
System]
1. Switch the ignition to off.
2. Disconnect the negative battery cable and wait for 1min or more..
3. Remove the front driver’s seat..
4. Disconnect the connector from the seat track positio ...
 Seat Weight Sensor Calibration [Two Step Deployment Control System]
CAUTION:
If any of the following work is performed, perform the seat weight sensor
calibration using the M-MDS.
Replacement with a new seat weight sensor
Replacement ...
Other materials:
Light Switch Removal/Installation
NOTE:
When removing the light switch, it is necessary to rotate the steering wheel.
If the ignition is switched off from ON (engine on) with the driver's door closed,
the steering wheel is locked. Therefore, perform the procedure in Steps 1 to
3 so that the steering wheel is not ...
Air Bag System Service Cautions [Standard Deployment Control System]
Air Bag System Component Disassembly
Disassembling the air bag system components could cause it to not operate
(deploy) normally. Never disassemble any air bag system components.
Air Bag Module, Pre-tensioner Seat Belt Handling
Oil, grease, or water on the air bag modules ...
Air Intake Actuator Inspection [Full Auto Air Conditioner]
1. Connect battery positive voltage to air intake actuator terminal B (or C),
connect terminal C (or B) to ground, and then verify that the air intake actuator
operates as shown in the table.
If the operation condition is not normal, replace the air intake actuator.
...
